What’s New in 2019.03
Accounting
Creating a General Ledger File System Improvements
When staff click the Create Ledger button for a batch, the system now generates the ledger for that batch behind the scenes. The user creating the ledger will receive an email notifying them that the general ledger has been created and is ready for export.
Sending an Order or Invoice Confirmation as an Email Attachment
Staff administrators can use the new configuration setting, Order Invoice Format, to choose how an order or invoice record is sent to customers when the Send as Email button is selected on the Order or Invoice Record. Options under this setting include:
- HTML: Transaction detail goes out in HTML email text, with no additional attachment.
- HTML and Same Attachment: Transaction detail goes out in HTML email text, with the same style document attached to the email.
- HTML and Different Attachment: Transaction detail goes out in HTML email text, with an attachment of the new report “Order Invoice Confirmation Attachment.”

Hiding Primary Address Fields when Members Shop on Behalf of an Organization
When a non-staff user is purchasing on behalf of an organization and selects the Add New Billing Address or Add New Shipping Address option during checkout, the following options will not appear:
- Save As Primary Address
- Save As Preferred Billing/Shipping Address
- Show as Directory
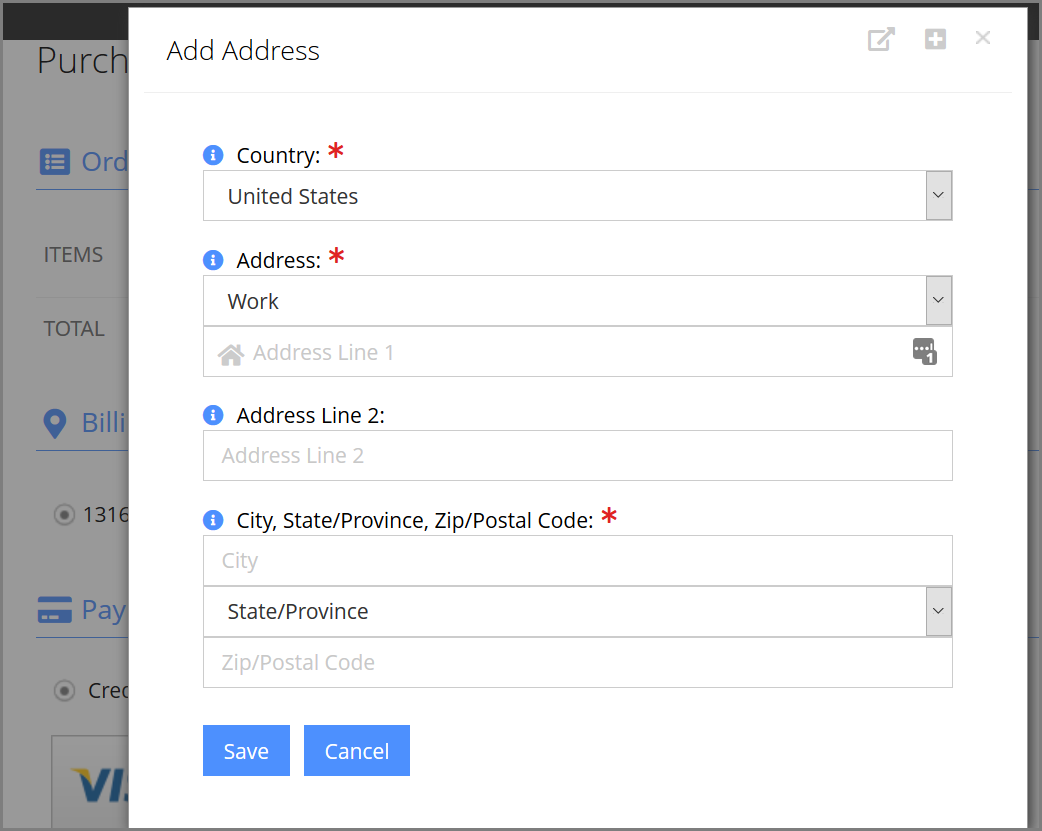
For staff users the options listed above will continue to appear.
Exporting Location in the General Ledger—Intacct Clients
For clients with Intacct configured as their accounting software, Location is now included in the general ledger export. This location is configured in the re:Members AMS business unit when editing or adding an account.
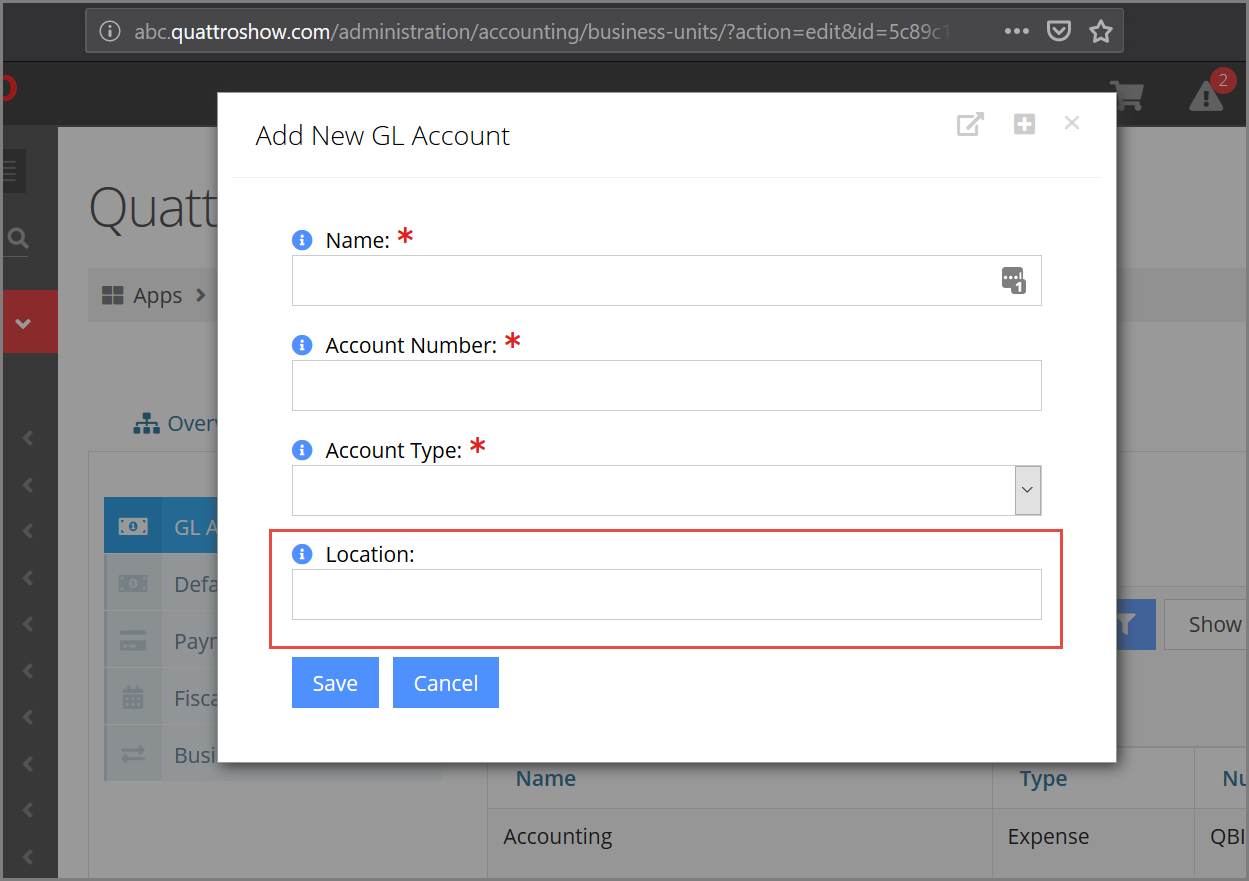
This location data appears in the general ledger file.
Configuring Batch Preselection for Product Checkout
To streamline the product checkout process, the system can now automatically populate a pre-selected batch during checkout. This setting can be enabled in the Configurations App, using the setting Preselect Last Selected Batch.
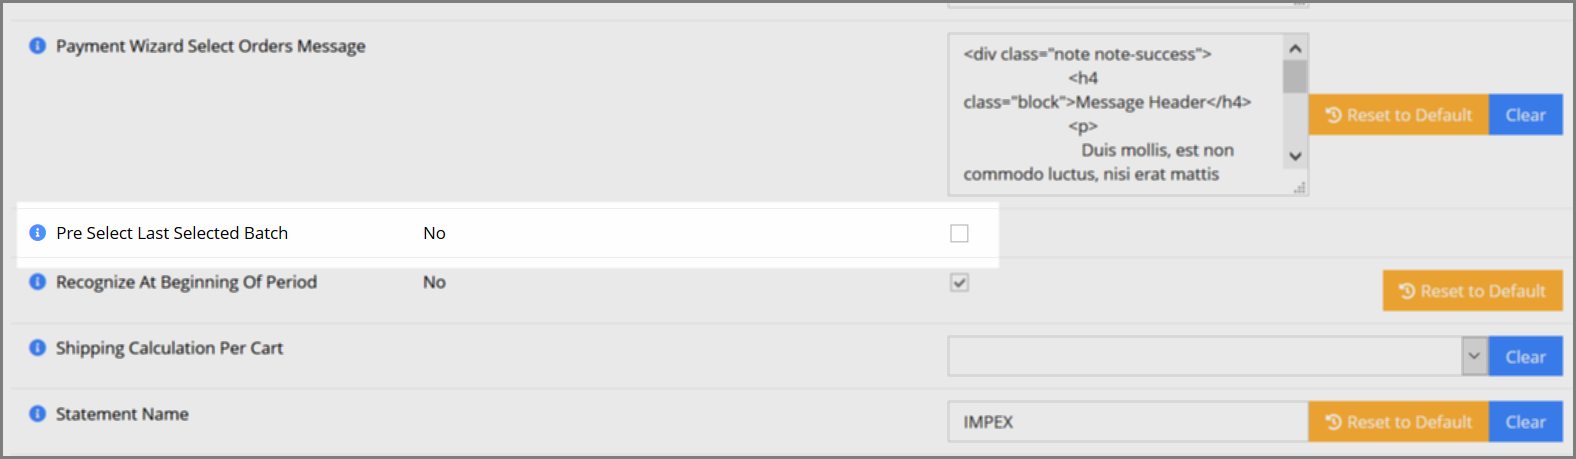
If this setting is enabled, when a staff user makes an initial purchase in re:Members AMS, they will be required to choose their desired batch as usual. The next time they go through the purchase process, the same batch will be preselected to streamline checkout. This selection is per user—that is, each user must make the initial choice of batch, and the system saves that user’s selection for their login only.
This functionality is accomplished via a cookie associated with the staff user’s browser session—this cookie is automatically deleted after 24 hours, at which point the desired batch must be selected again. If cookies are deleted, the batch must also be re-selected.
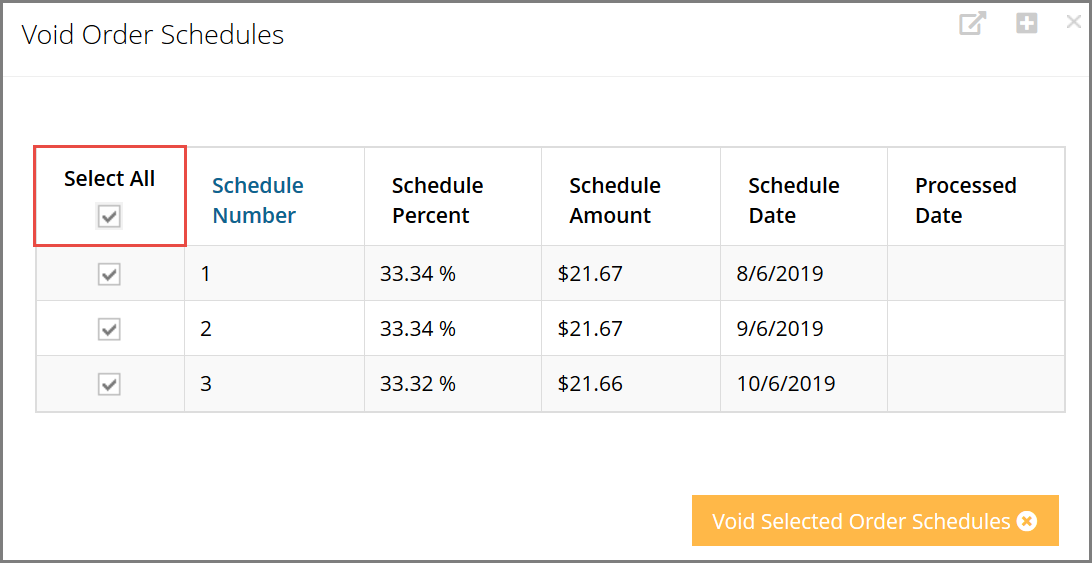
Choosing “Select All” when Voiding Order Schedule
When using the Void Order Schedules functionality, the “Select All” option now appears, allowing quick selection of all items. This feature is accessible via the Order Record > Void Schedule button. Only orders with an installment schedule will display this option.
Manually Creating Credits
Staff can now manually add a credit to a customer record.
This feature is accessible under the Accounting App > Credits > via the Add New Credit button.
- In the Add New Credit form, begin typing the name of the customer to receive the credit in the Customer field and select the desired customer.
- Enter the amount to be credited in the Credit Amount field.
- Click the Refundable check box if the amount should be refundable (and not just a store credit).
- In the Note text box, enter a note describing the reason for the credit.

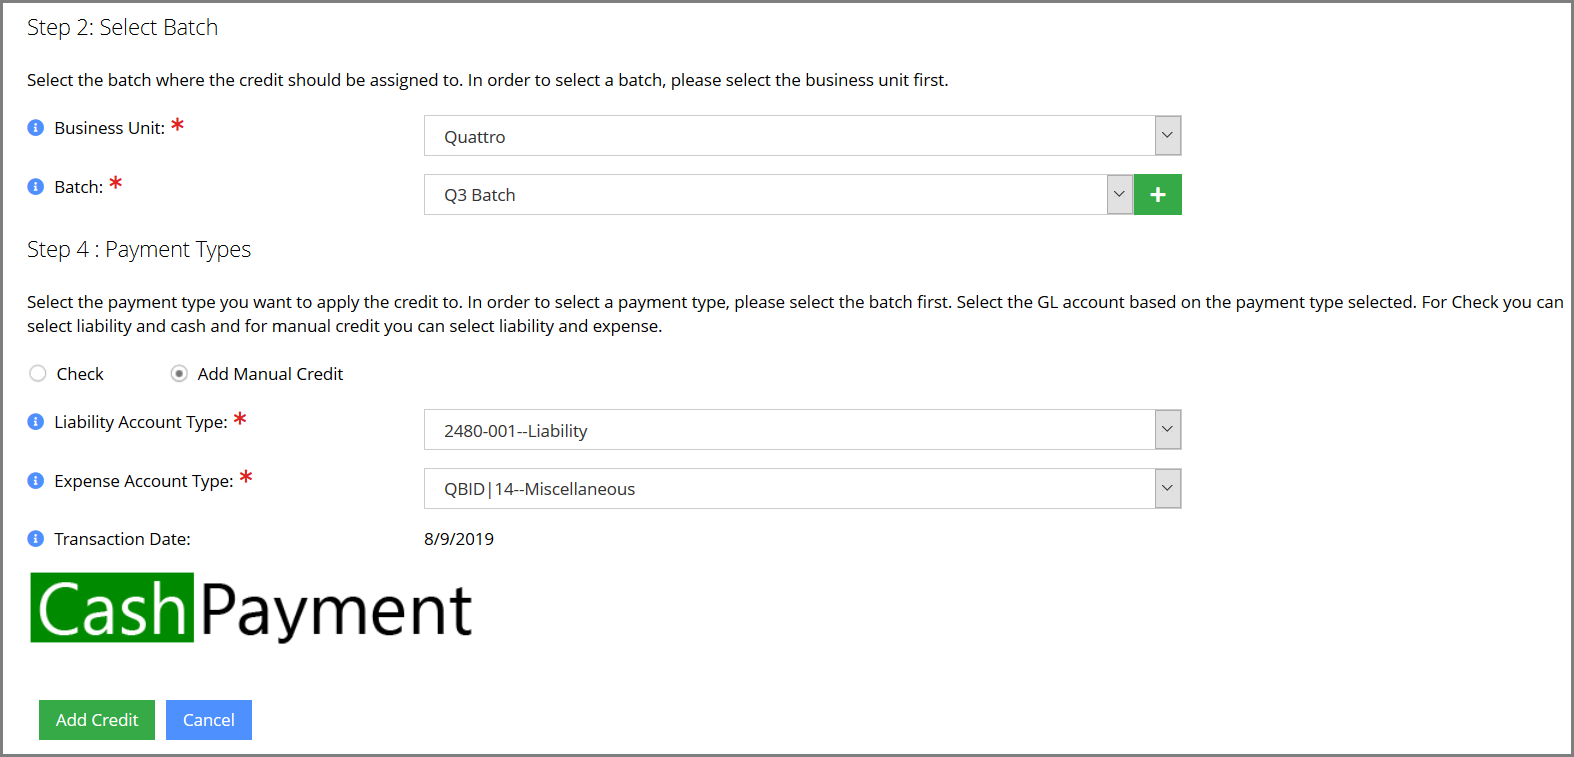
- Select the Business Unit to choose a Batch. Staff can also create a business unit from this form by selecting the green Add icon.
- Choose the payment type with which to associate the credit. Options include:
- Check: Select this option if a check was received which should be applied to a Customer Record as a credit. E.g., if no open balances exist on the Customer Record and the check supporting documentation with the check doesn’t provide adeqthe Sandboxe information to create an invoice.
This selection uses a Cash instead of an Expense account because funds are already accounted for via the check.
- Add Manual Credit: Choose this option if a manual credit must be applied. E.g., if a student receives a scholarship from the association, or if a credit otherwise should be applied for which no additional funds came in.
This selection uses an expense account.
- Select the Liability Account Type.
- “Add Manual Credit” payment type only: Choose the Expense Account Type.
- “Check” payment type only: Choose the Cash Account Type, then enter the Name on Check, Check Number, and Check Date.
- Click Add Credit.
Administrator
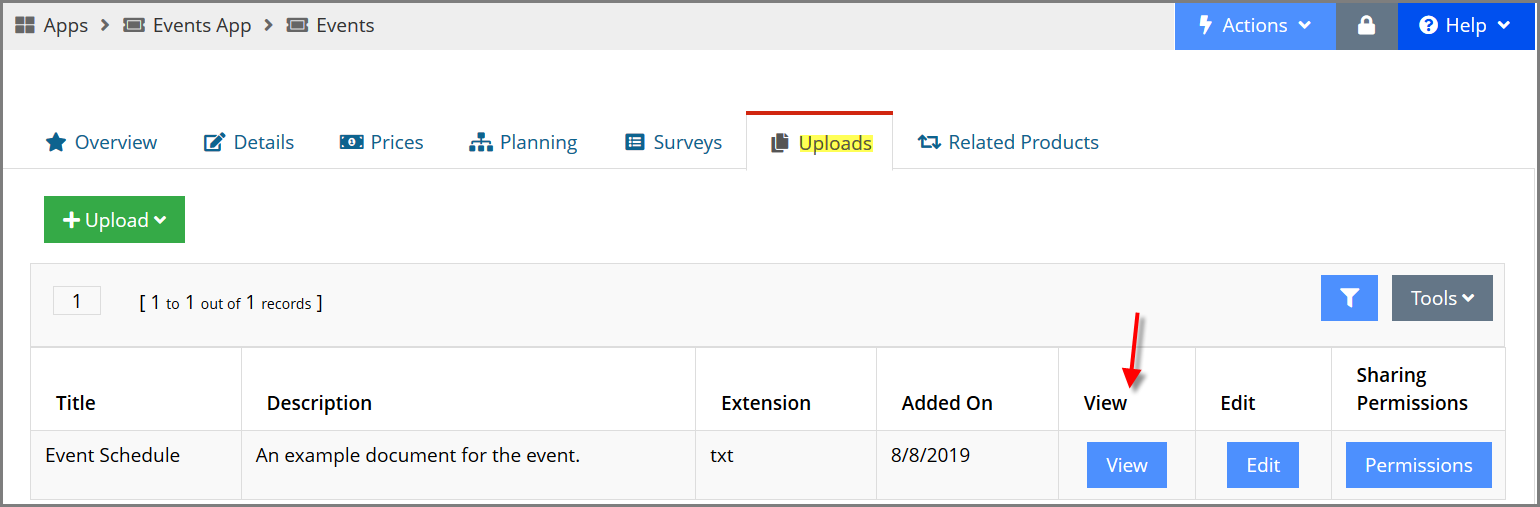
Previewing Documents without Requiring Download
Documents associated with a record in re:Members AMS can now be previewed without the need to download the file.
Navigate to any record with an associated uploaded file, such as a Customer Record or a Product Record. Under the Uploads tab, locate the View button next to the uploaded file. Click View to open a preview of the file in a modal window.
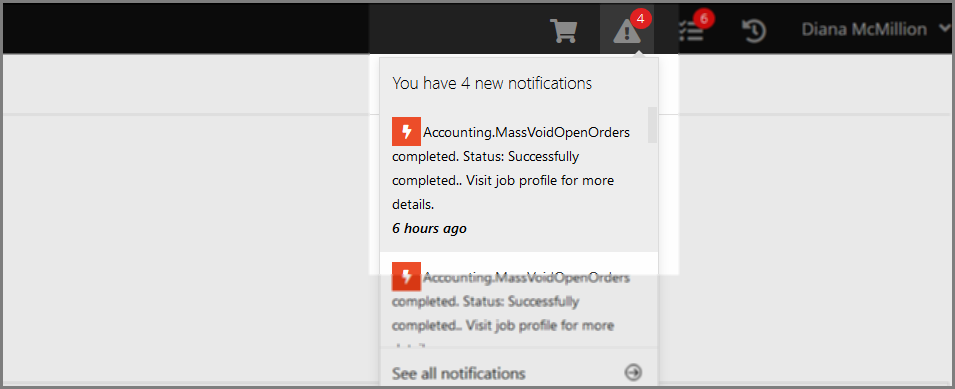
Receiving Notifications when Jobs Complete
When a staff user schedules a job or process to run behind the scenes in the system, the system now displays a notification under the Notifications icon in the top toolbar.
Using the “File Upload” Custom Field
An “upload” custom field can now be included in custom forms, allowing users to upload a document from the custom form. In field creation, choose Field Data Type “Field.”
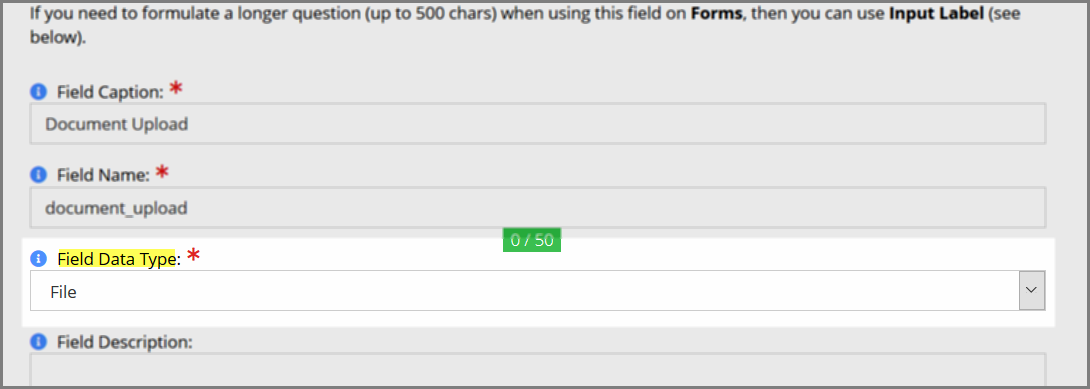
This allows the user to upload a file or link to a URL containing the document. If the upload option is selected, the subsequent screen displays allowed file extensions.
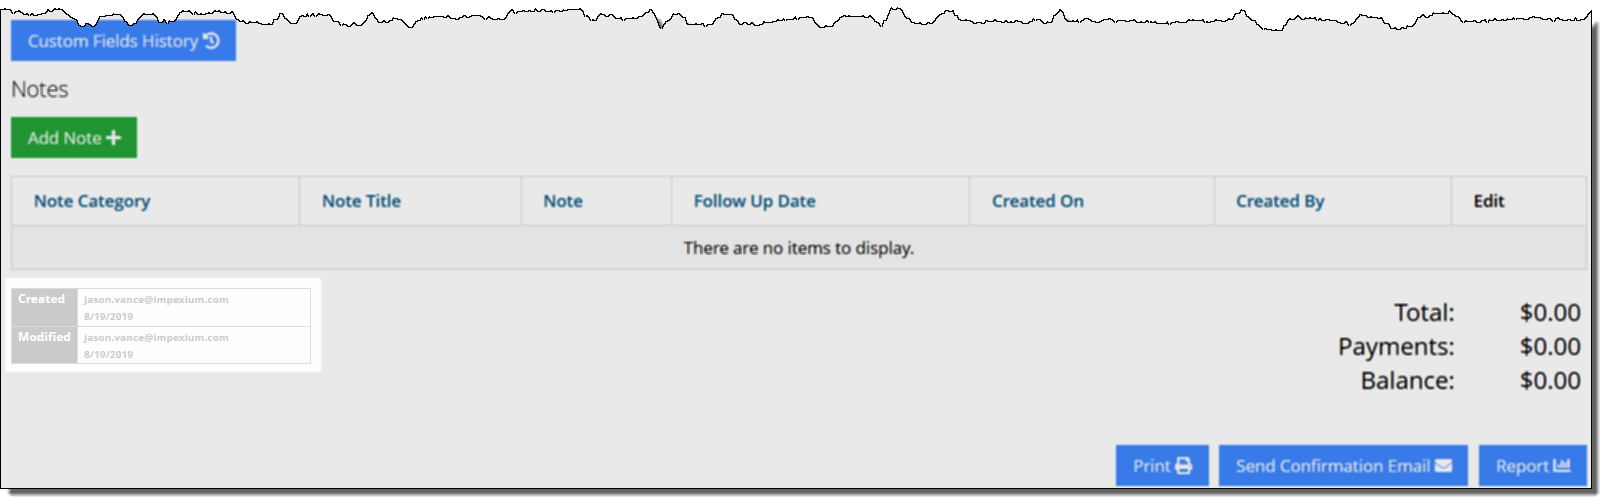
Viewing “Created” & “Modified By” on Orders & Invoices
Staff can now see the user who created and last edited an order or invoice, via the label at the bottom of those record types. The date displayed is local for the user viewing the record.
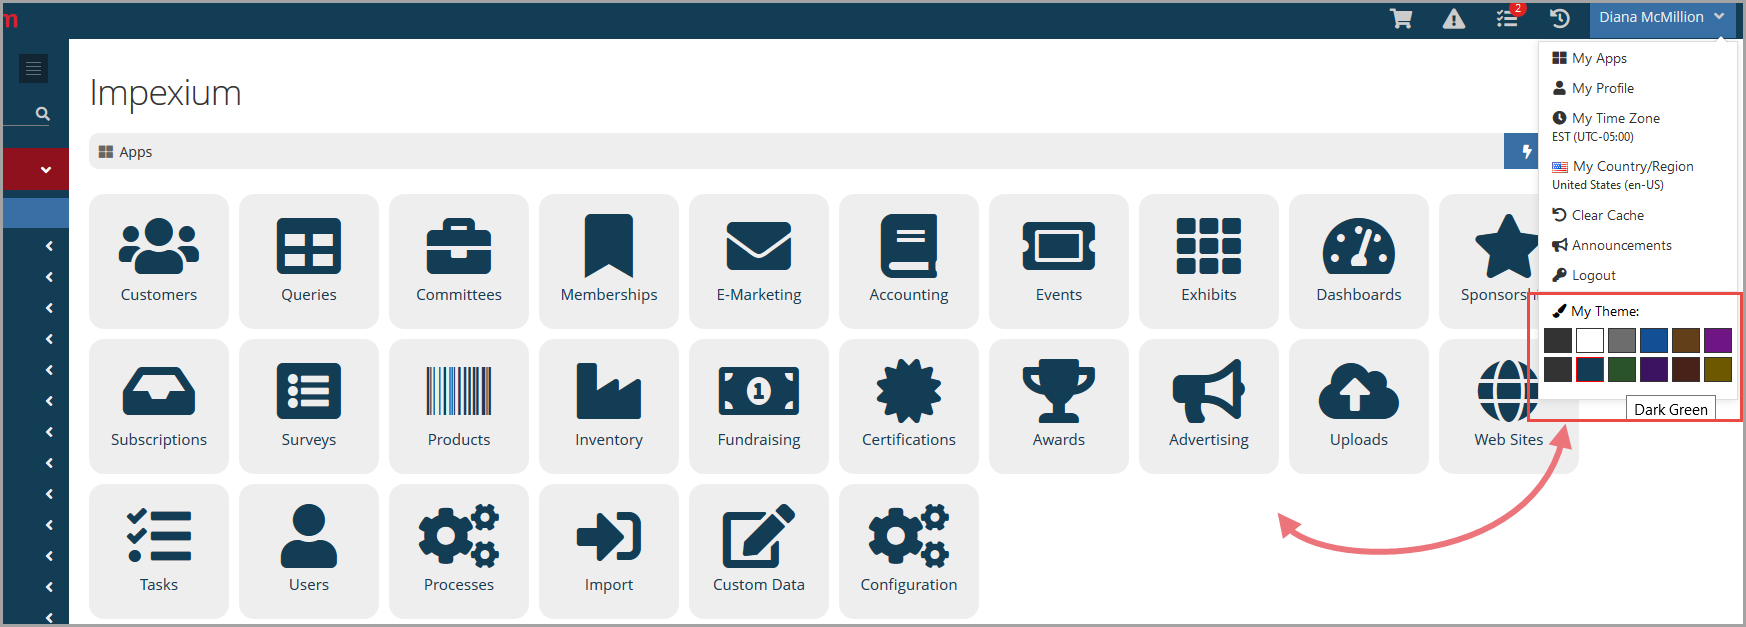
Using the Streamlined App Icon Themes
For staff interested in a different “look” for their application icons, they can select from several new options in the My Profile drop-down, under the My Theme section.
Certification
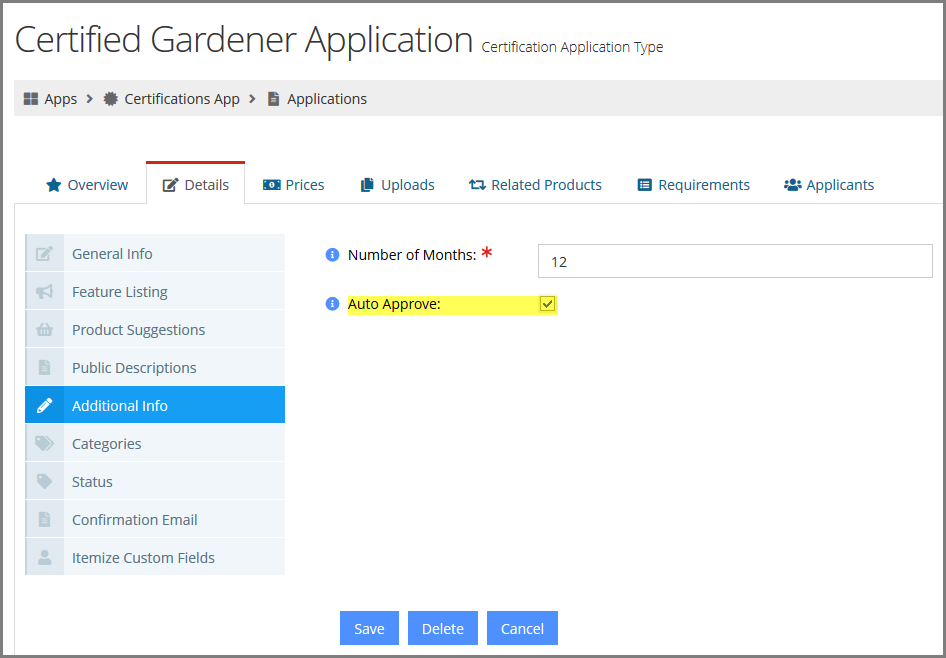
Setting Certification Application Auto-Approval
For clients who wish to eliminate the additional step of manually approving certification applications, the system can be configured to automatically approve applications.
- Navigate to the Certifications App > Applications feature.
- Open the Application Record.
- Open the Details tab, Additional Info menu option.
The Auto Approve checkbox now appears. Applications without requirements that have this setting enabled are automatically marked as “approved,” and do not require staff approval.
Note that if an application has requirements and Auto Approve is enabled, the application is not auto approved.
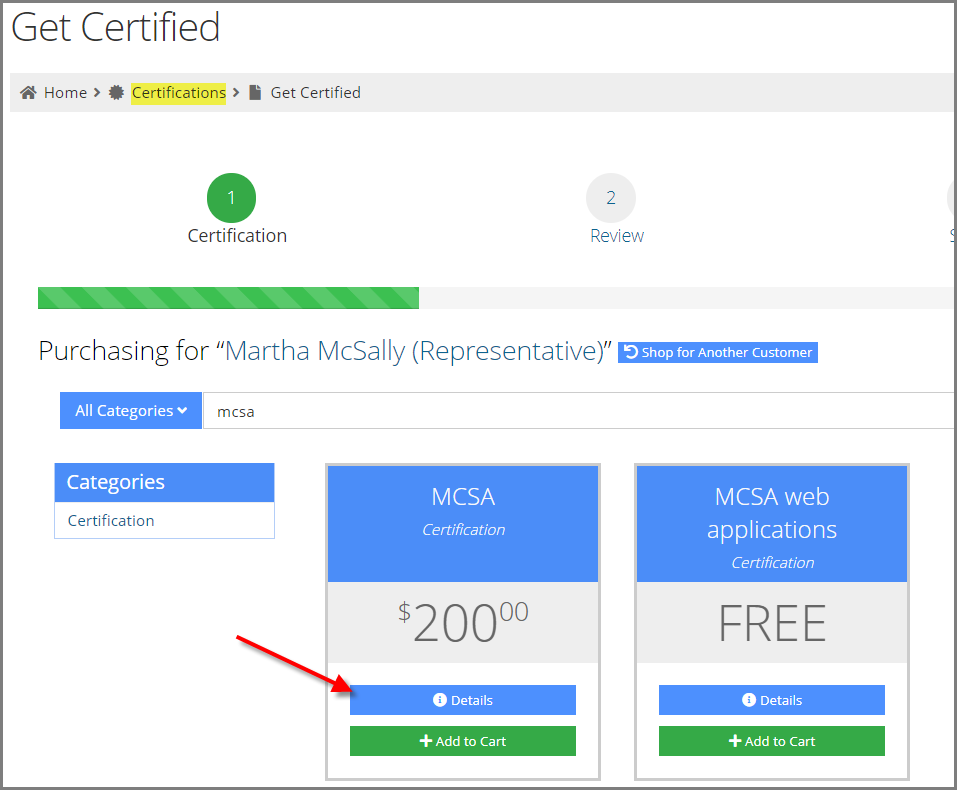
Viewing Product Detail in Certification Purchase Wizard
During checkout for a certification product, a Details button can now be configured to appear, allowing users to view more information about the certification being purchased.
This setting can be configured in the Websites App, using the Certification Purchase Wizard content item. The Allow Details View checkbox can be enabled to link to a certification detail page.

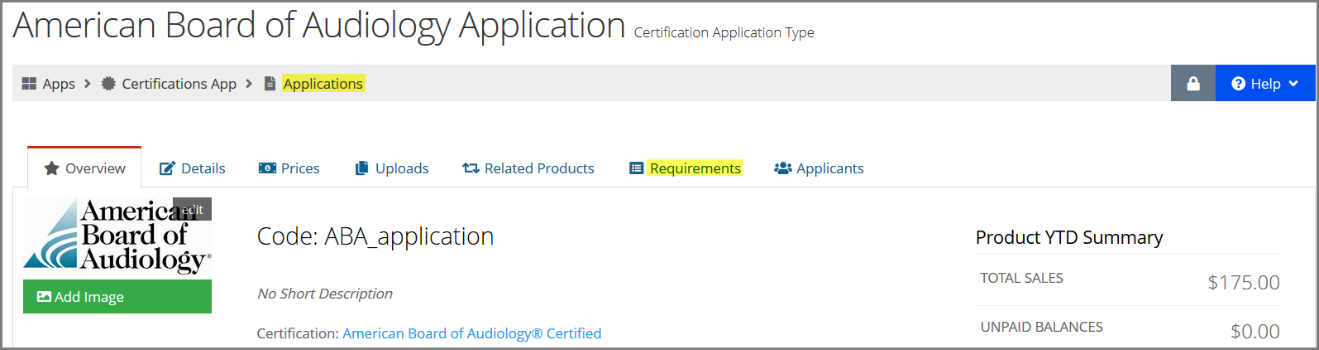
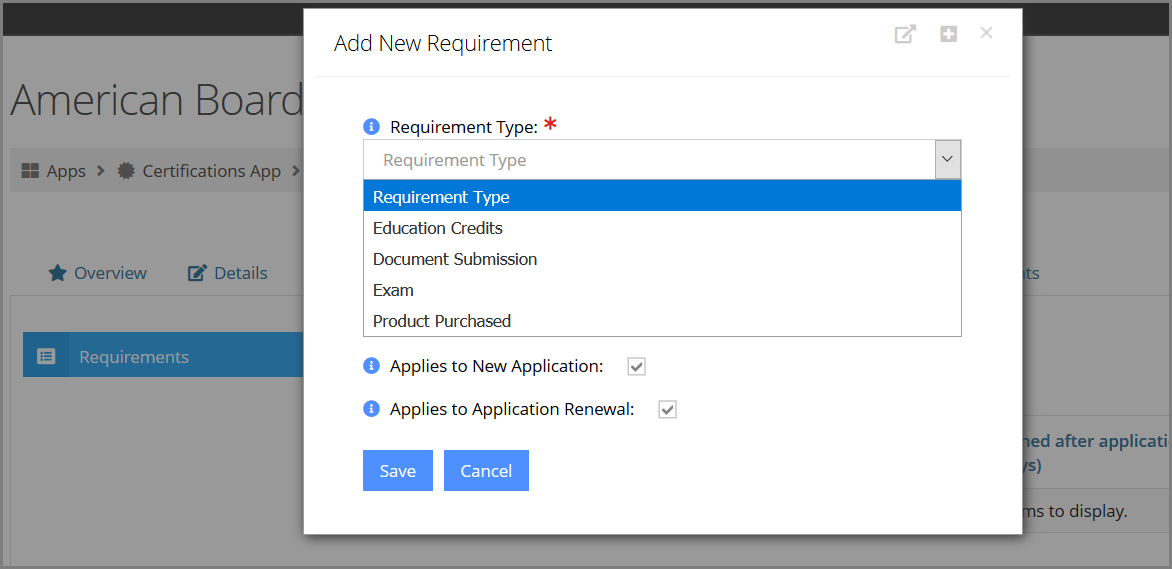
Configuring Requirements on an Application Record
Staff can now set requirements for an application. Previously, requirements could only be associated with a certification. To set requirements on an application,
- Navigate to the Certifications App > Application feature.
- Open the Application Record.
- Click the Requirements tab.
Settings under this tab allow for the creation of requirements for the application. Requirements can still be configured on the Certification Record as well.
Requirements that can be configured include:
- Education credits
- Document submission
- Exam completion
- Product Purchase
Requirements can also still be specified as for new and/or renewing applicants only.
Viewing Applicants via the Application Record
Staff can view a list of all applicants via the Application Record > Applicants tab.
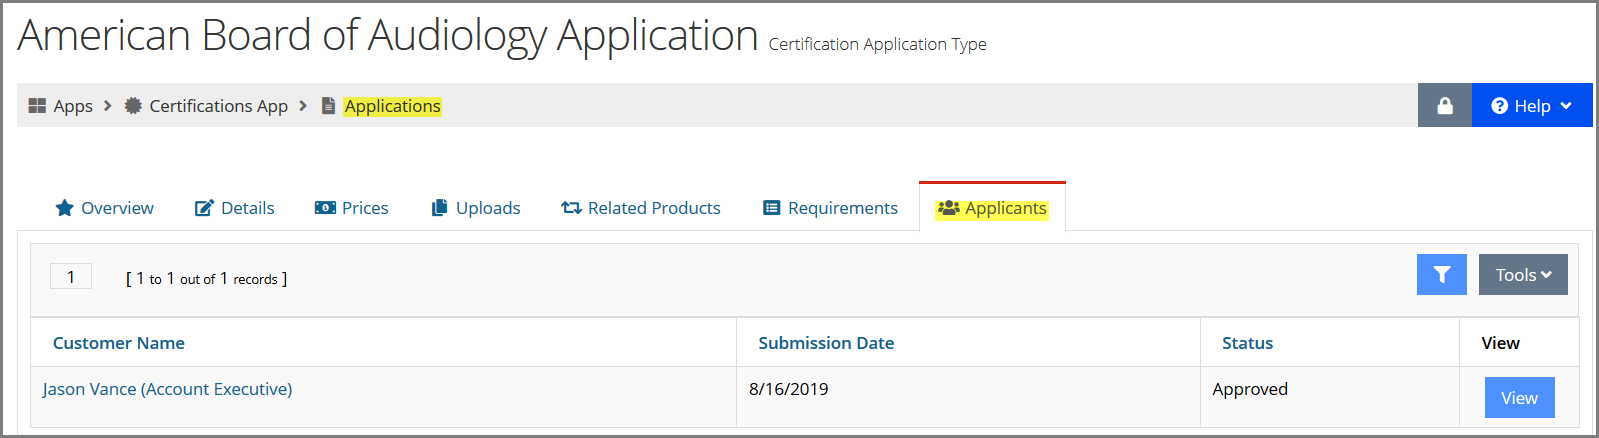
Clicking the View button next to the applicant name loads the application purchase detail page for that applicant.
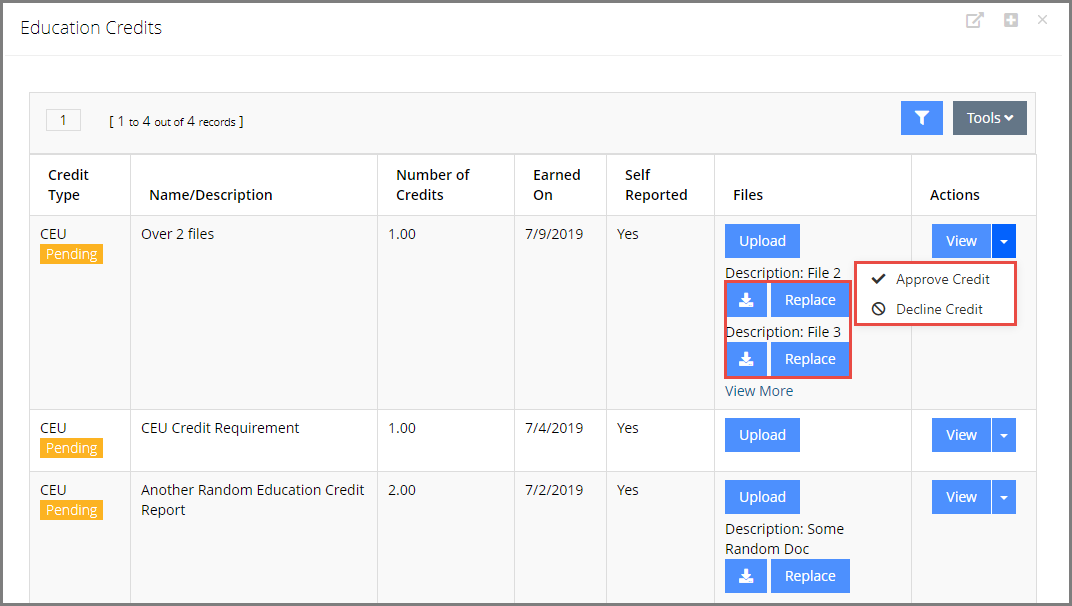
Using Enhanced Options when Adding Self-Reported Education Credits
When self-reporting education credits related to a certification, additional options are available on the reporting window. This includes the option to download and replace existing files as well as the option to approve or decline the credit from that screen.
This option is available under the Customer Record > Purchases tab > Certifications > Requirements.
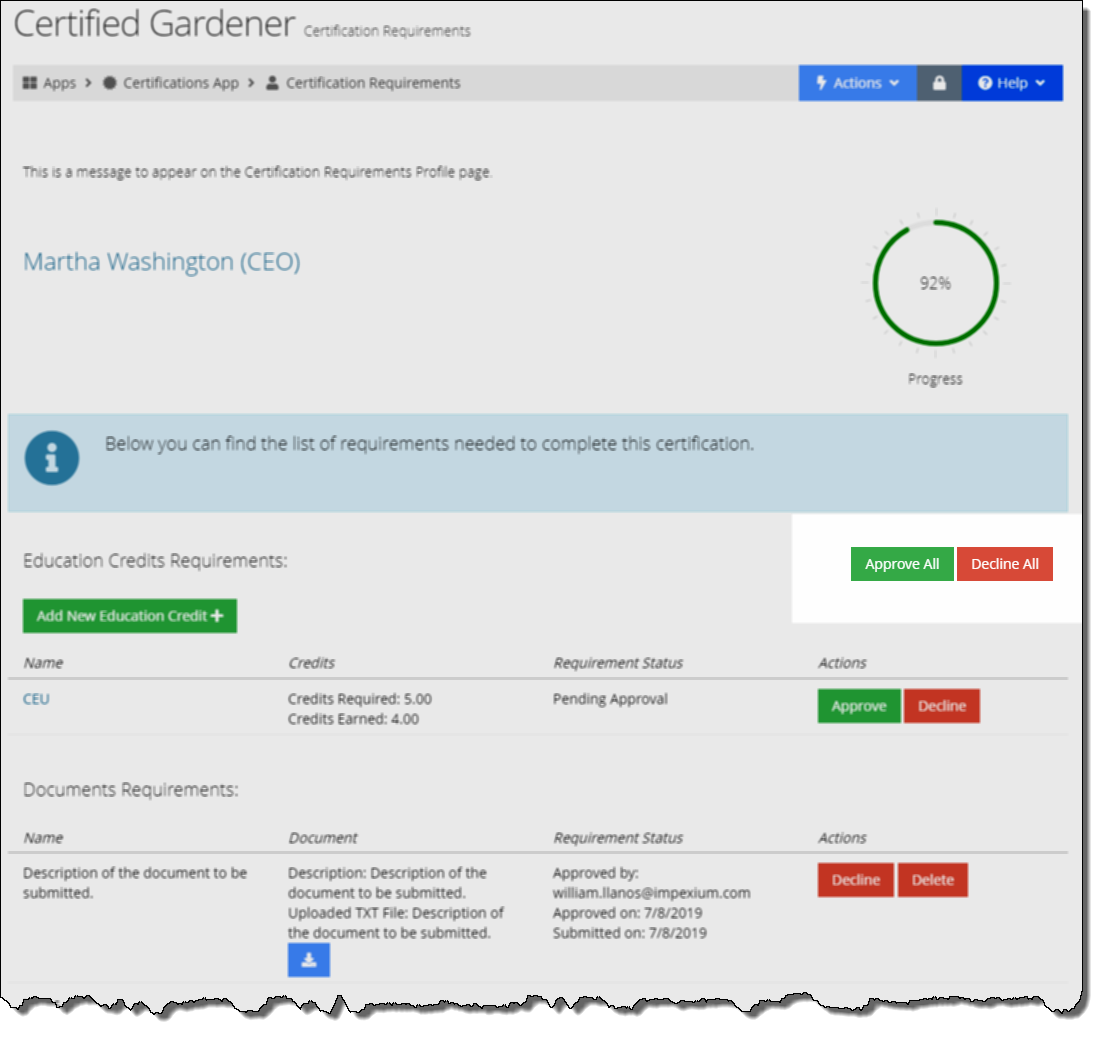
Approving or Declining all Submitted Requirements
Staff now have the option to, on the Certification Requirements Page and on the Application Requirements Page for a certificant, to approve or decline all submitted requirements.
Accessing Certification Requirement Detail Page Enhancements
For customers who have purchased an application or certification requiring completion of an exam, several enhancements now make the Requirements Detail page easier to use.
- The Get Exam Now button appears on the requirements detail page. Clicking this button takes the user directly to the Exam Purchase Wizard.
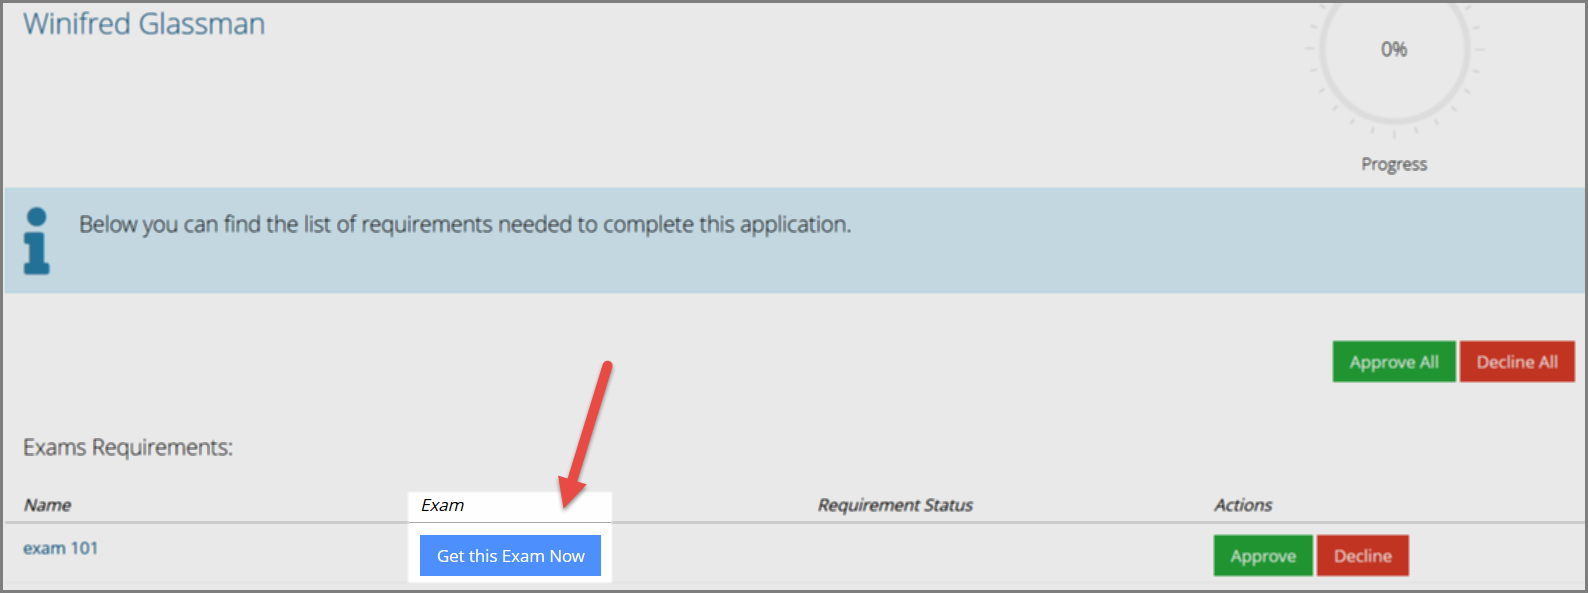
- In cases where the customer’s exam purchase does not fall within the time period designated by staff, the date is highlighted to draw user attention to the potential issue.
- If the application or certification requires a product purchase, staff users see the option to “Approve” or “Decline” the requirement for members, even if the product is not yet purchased.
If it is unpurchased, a warning message appears. Similar functionality is available to approve yet-unearned education credits and required documents that have not yet been uploaded.
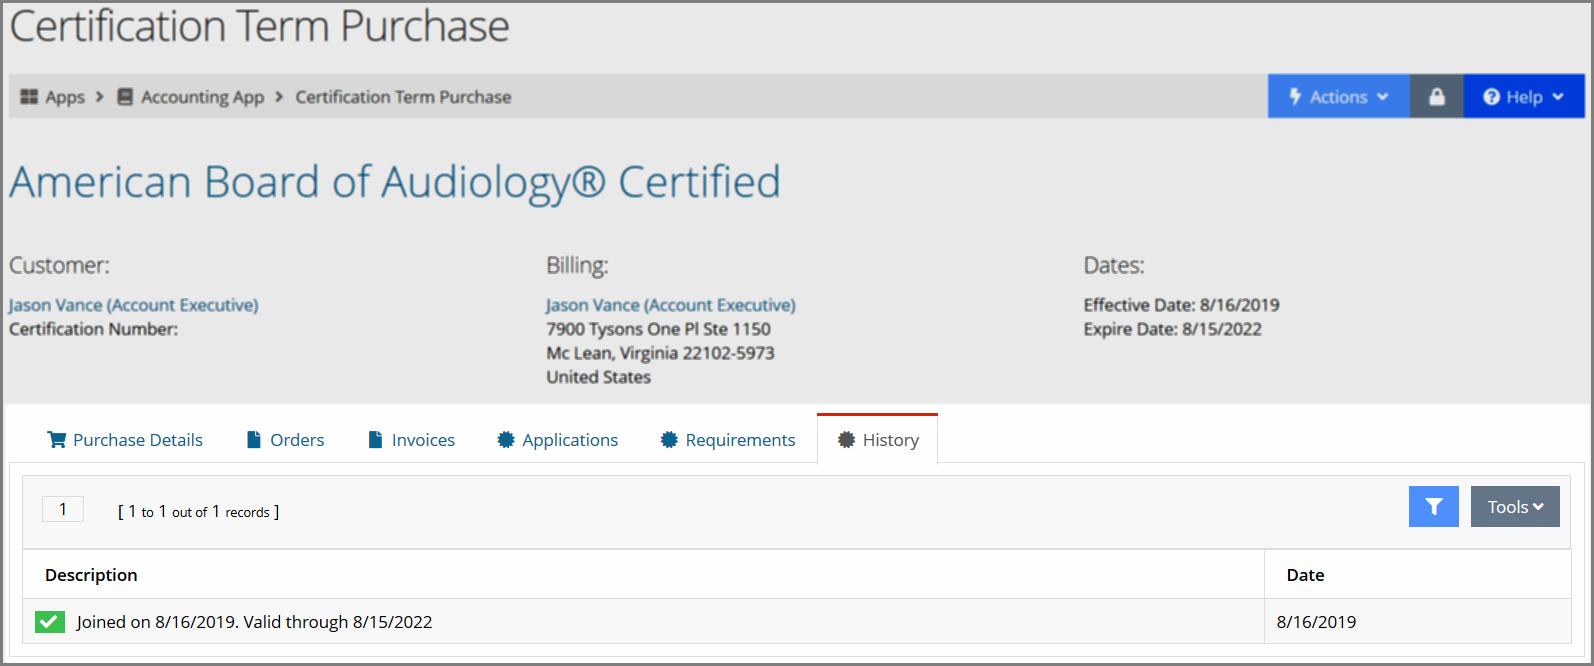
Viewing a Certificant’s Certification Detail
Additional detail on an individual’s history with a certification is now accessible under the Individual Record > Purchases tab > Certifications menu option.
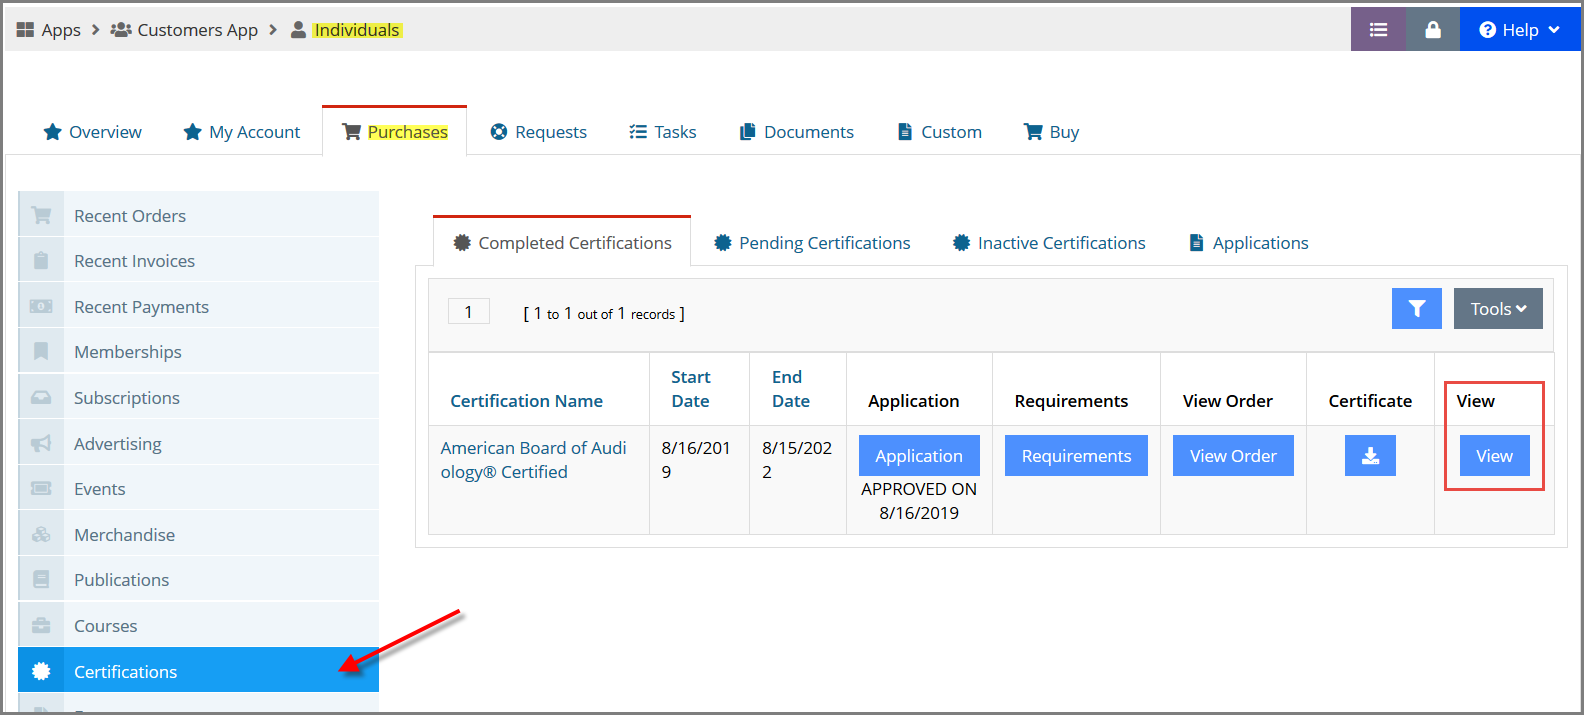
Click View next to a certification to see more details, including:
- Effective and expiration date
- Termination date and reason
- Orders and invoices related to the certification
- Instances of application for this certification
- Certification requirements
- Certification history
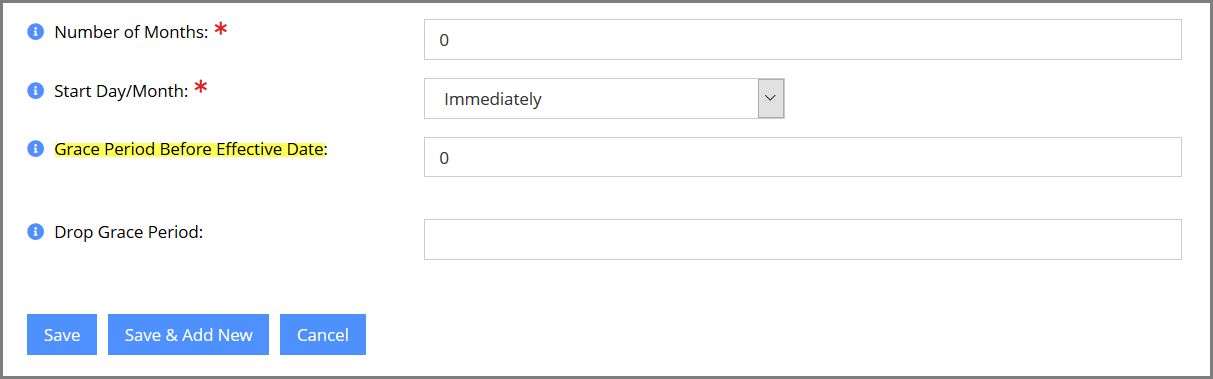
Including Grace Period in Certification Setup
When creating or editing a certification, the option is available to include a Grace Period Before Effective Date.
Like functionality of the same name available in membership setup, this option allows certification benefits to be conferred before the actual start date of the certification.
Editing Education Credits that were not Self-Reported
Education credits that were not self-reported (such as those earned from attending an event or purchasing a product) can be edited by staff users. To edit:
- Navigate to the Individual Record > Account tab.
- Select the Education Credits menu option.
- Locate the education credit you wish to edit and click View.
- In the Individual Education Credit form,
- Click the Details tab.
- Locate the Number of Credits Earned field and enter the desired value.
- Click Save.
Note: For credits approved prior to editing, these return to the “Pending” approval status once they’ve been edited. Staff must approve edited credits again.
Displaying Requirements During Application Purchase
When an application is purchased, requirements for the application appear during the checkout process.

This functionality appears in the web page content “Application Purchase Wizard” and “One Page Checkout.”
Configuring the Streamlined Application & Certification Flow
The 2019.03 build allows for the configuration of a more streamlined application and certification flow, using existing functionality and the Certification Programs web page.
This new functionality displays a list of available certifications that non-staff users can select from. Once begun, the application process collects additional data during checkout, including contact information, application and certification requirements, and more.
The original application and certification processes, which required separate purchase of an application and certification, is still an option for clients who prefer that setup and wish to continue using it.
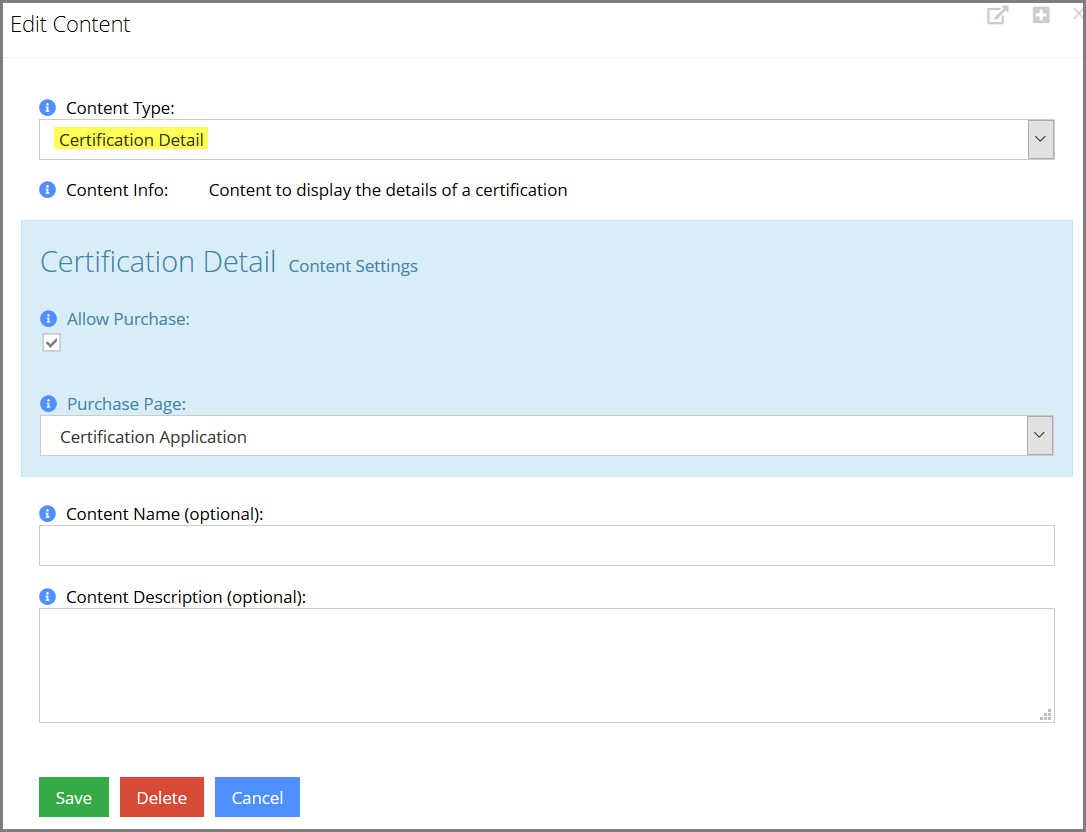
Displaying “Certification Programs” Web Page Content
Available certification programs can now be displayed for customers on a web page, using the Certification Programs web page content.
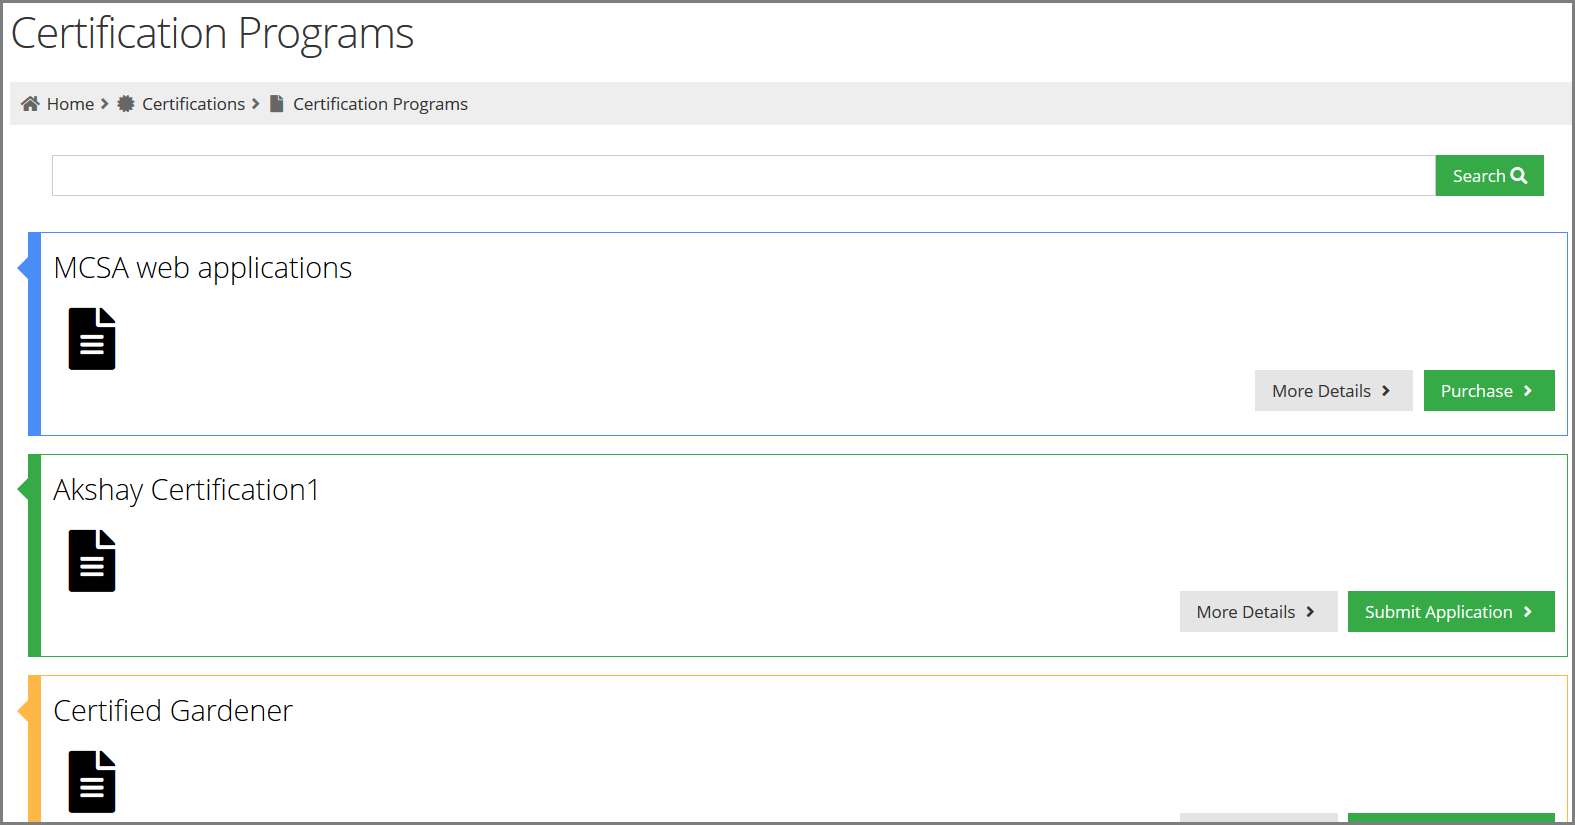
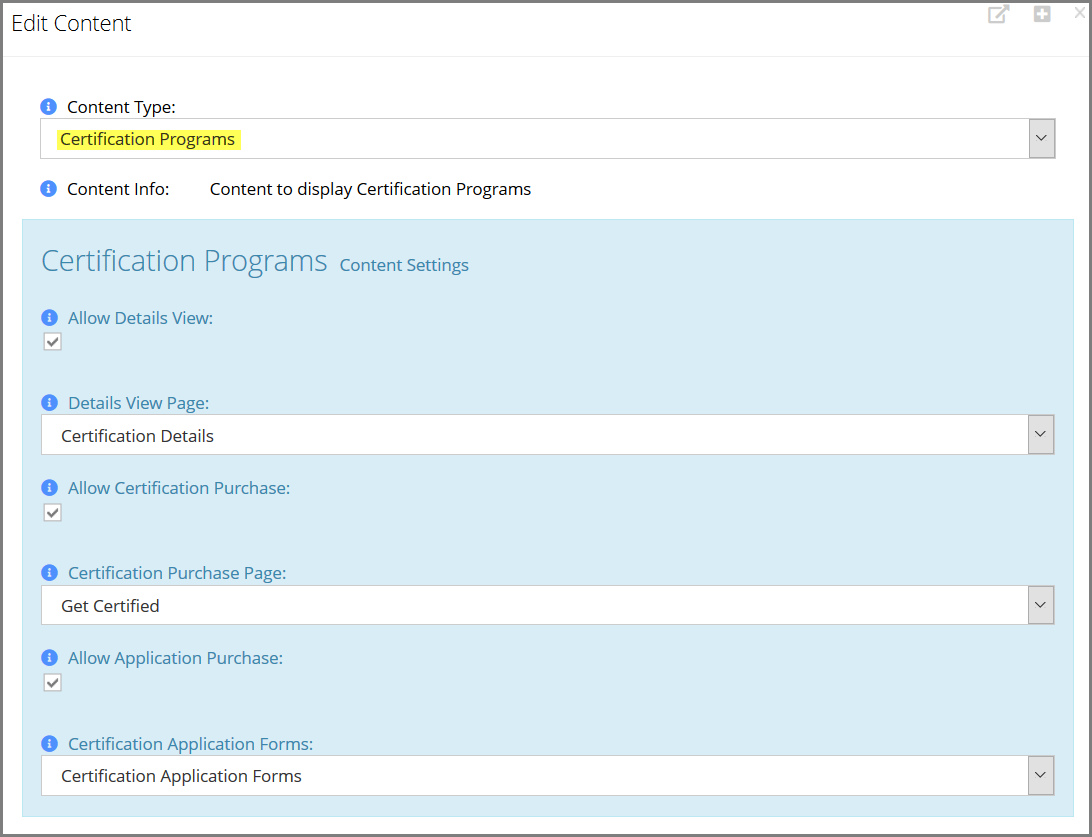
This content type can be used to configure whether product details should appear, and whether to allow the purchase of a certification or an application from this page, using the following settings:
- Allow Details View: Displays a detailed description of the certification.
- Allow Certification Purchase: If the certification has no associated application, allows end users to purchase the certification.
- Allow Application Purchase: Allows end users to purchase a certification application.
The page itself looks like re:Members AMS’s Upcoming Events page, listing available certification programs and allowing the option to certify, view more details/requirements, or apply.
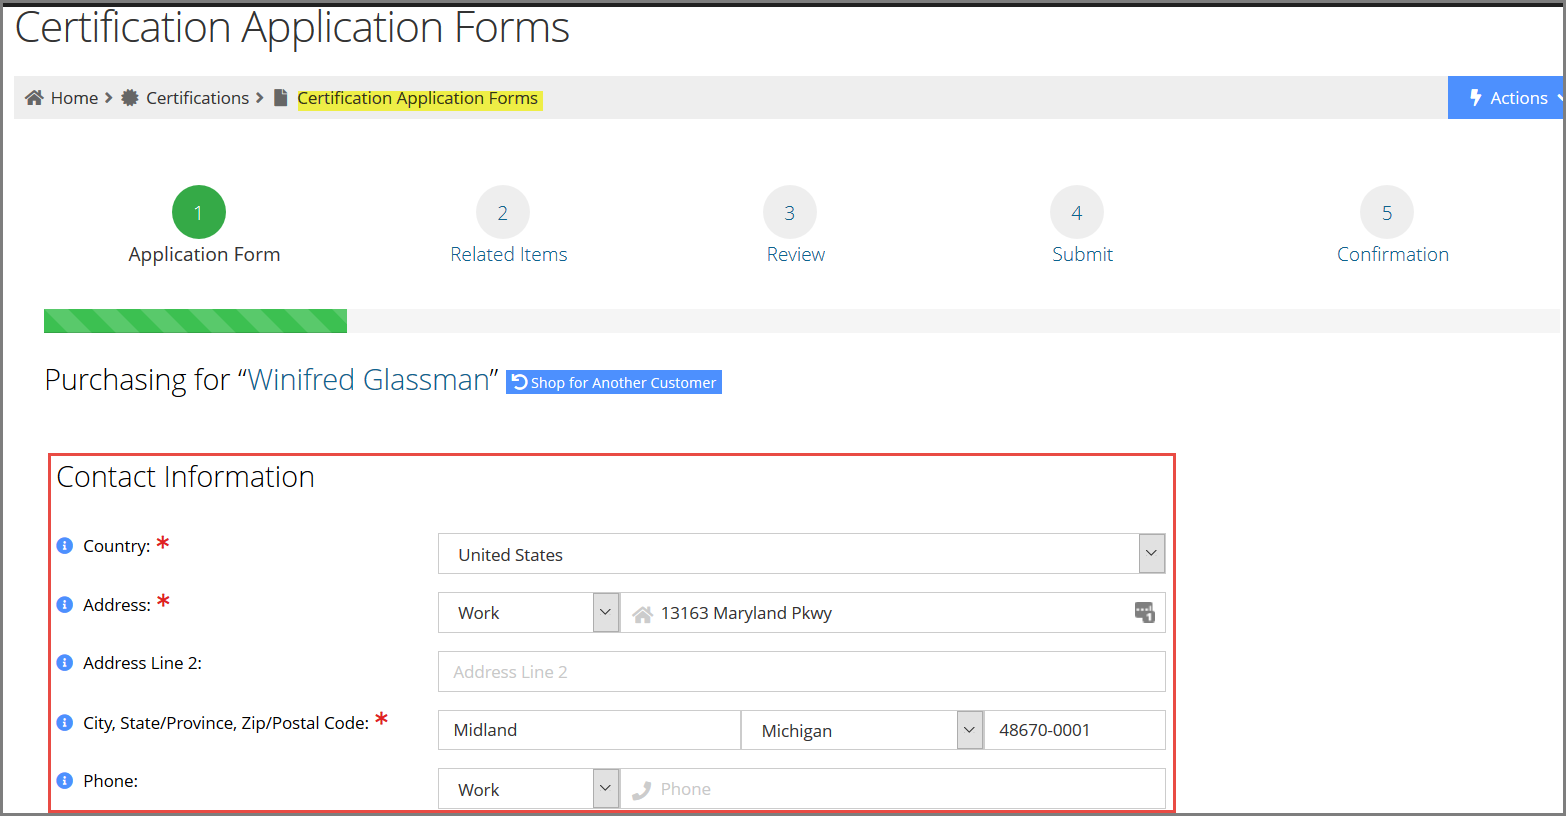
Configuring a Certification Application Form to Appear During Checkout
The Certification Application Form content item can be configured to appear on a web page. Content settings include:
- Ask for Custom Form
- Ask for Contact Info
- Ask for Address
- Ask for Phone
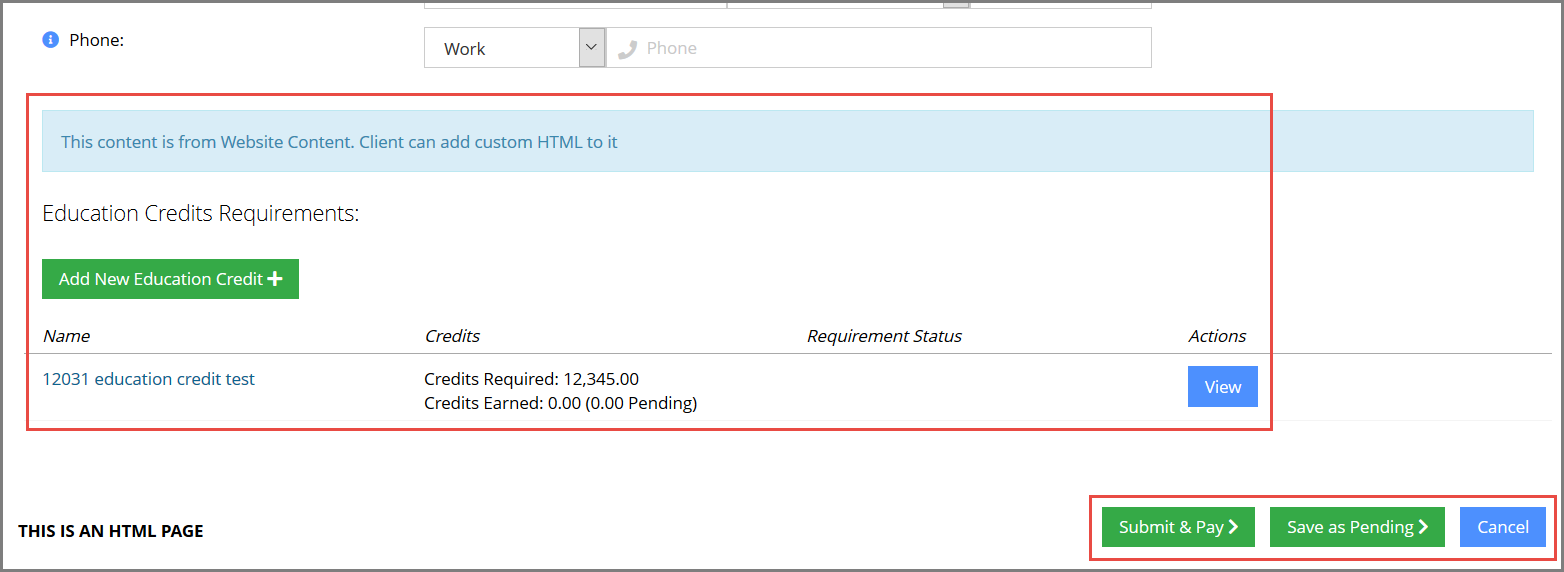
- Ask for Application Requirements
- Education Credits Requirements HTML
CMS
Directly Linking to Tabs in the Basic My Profile
For clients using a web page with the My Profile (Basic) content item can now directly link to sections within that page in a method like the traditional My Profile page.
Use the URL format: [my.association.domain]/[basic-profile-page-name]?tab=[tabname]. For example, to link to the My Personal Info tab, a user logged in to members.myassoc.com might enter the following URL:
http://members.myassoc.com/basic-profile?tab=account
- To link to the My Personal Info tab, the following terms can be used: “account,” “profile,” “myprofile,” “overview,” “personalinfo,” OR “mypersonalinfo.”
- To link to the My Contact Info tab, the following terms can be used: “contact,” “contactinfo,” OR “mycontactinfo.”
- To link to the My Organizations tab, the following terms can be used: “organizations” OR “myorganizations.”
- To link to the My Recent Orders tab, the following terms can be used: “orders,” “myorders,” “myrecentorders,” OR “recentorders.”
- To link to the Security & Privacy tab, the following terms can be used: “security,” “privacy,” “myprivacy,” OR “mysecurity.”
Configuring the Organization Roster Page “Add New” Button Dialogue
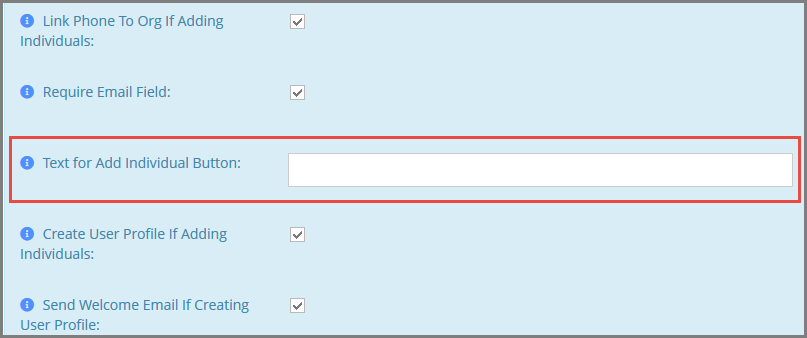
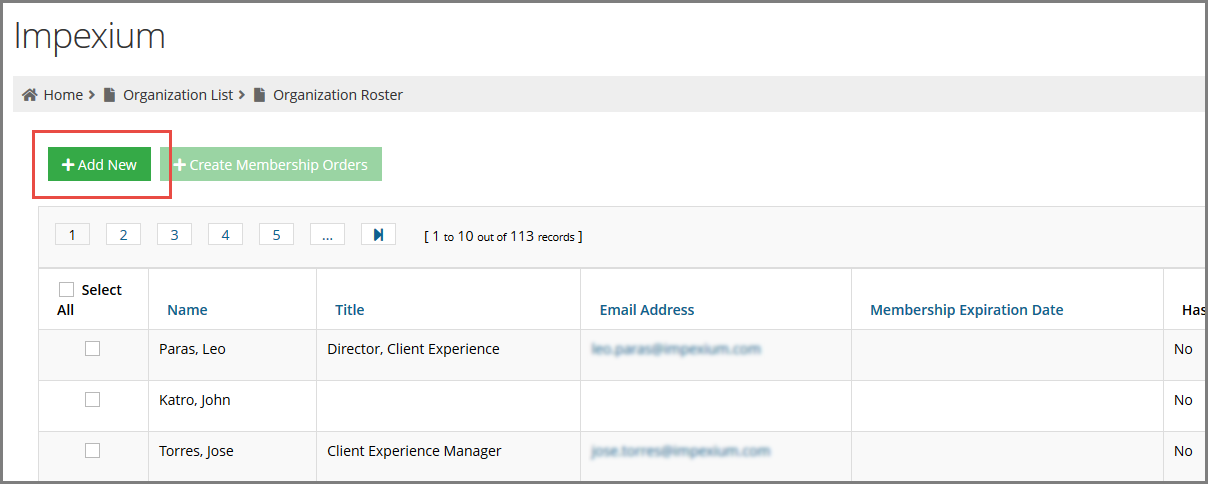
For clients using the “Organization Roster” web page content and allowing their non-staff users to relate new individuals to their organization, the text for the button can be changed to reflect the unique relationship type being created.
This setting is visible when adding or editing the My Organization Roster content item under the Web Sites App. In the Text for Add Individual Button field, enter the desired terminology, which will be preceded by the text, “Add New.”. For example, if the term “Student” is entered, the button on the Organization Roster page will display “Add New Student.” If the field is left blank the button displays the text, “Add New.”
Tracking Engagement Scoring
The system can now be configured to track customer engagement by assigning a score based on their level of system engagement. To set up this functionality,
- Navigate to the Customers App > Setup feature.
- Select the Score menu option.
- Click the Add New Score Rule button.
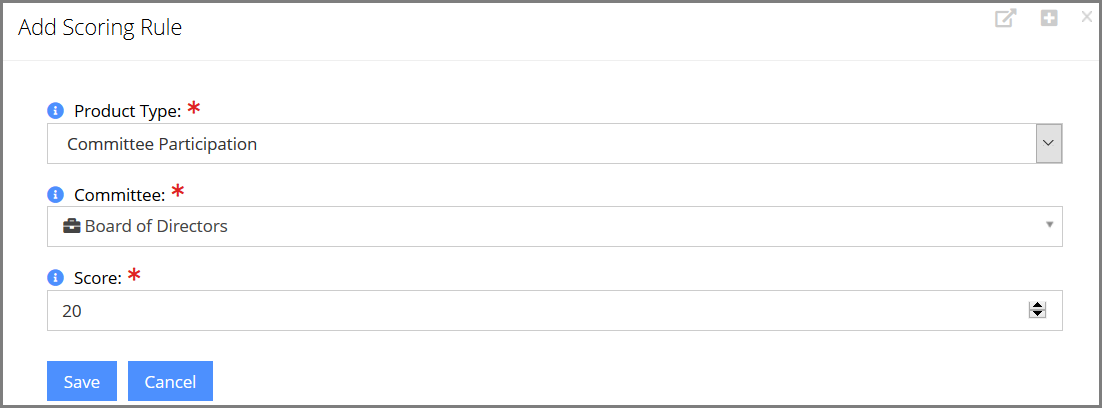
- In the Add Scoring Rule form:
- Using the global lookup, locate the Engagement Type with which the score should be associated. This can be Committee Participation or Product Purchase.
- For "Committee Participation," enter the Score to associate with this engagement type.
- Click Save.
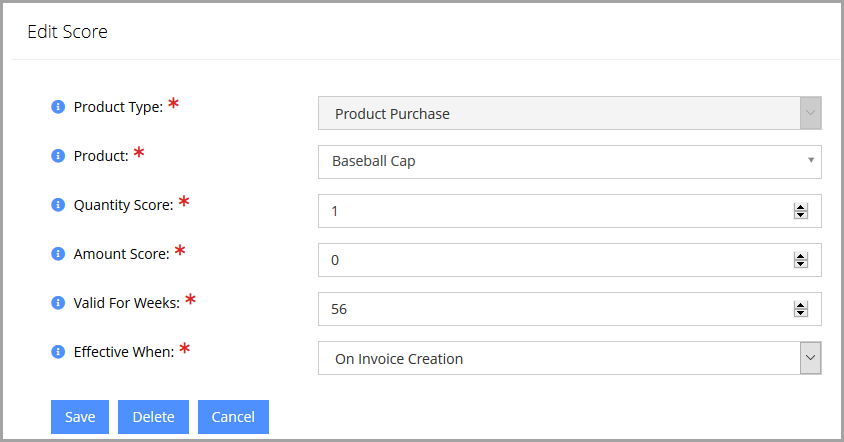
- For “Product Purchase”: Associate the Product that this score should apply to.
- Enter the Quantity Score—this value awards additional points the more of a product is purchased.
For example, if the quantity score is “1” and someone purchases 5, their quantity score total will be 5. If the quantity score is “2” and someone purchases 5, their quantity score total will be 10. - Enter the Amount Score—this value awards points based on the cash value spent on the product.
For example, if the amount score is “0.5” and someone spends $100 on the product, the total amount score awarded by that transaction will be 50. If the amount score is 2 and $100 is spent on the product, the total amount score awarded will be 200. - Specify how long the score should be valid after the product is purchased in the Valid for Weeks field. At the end of that period, the customer’s total score will be reduced by the amount earned from that instance of product purchase.
- Choose when the score should go into effect in the Effective When field:
- On Order Creation
- On Invoice Creation
- Click Save.
- Enter the Quantity Score—this value awards additional points the more of a product is purchased.
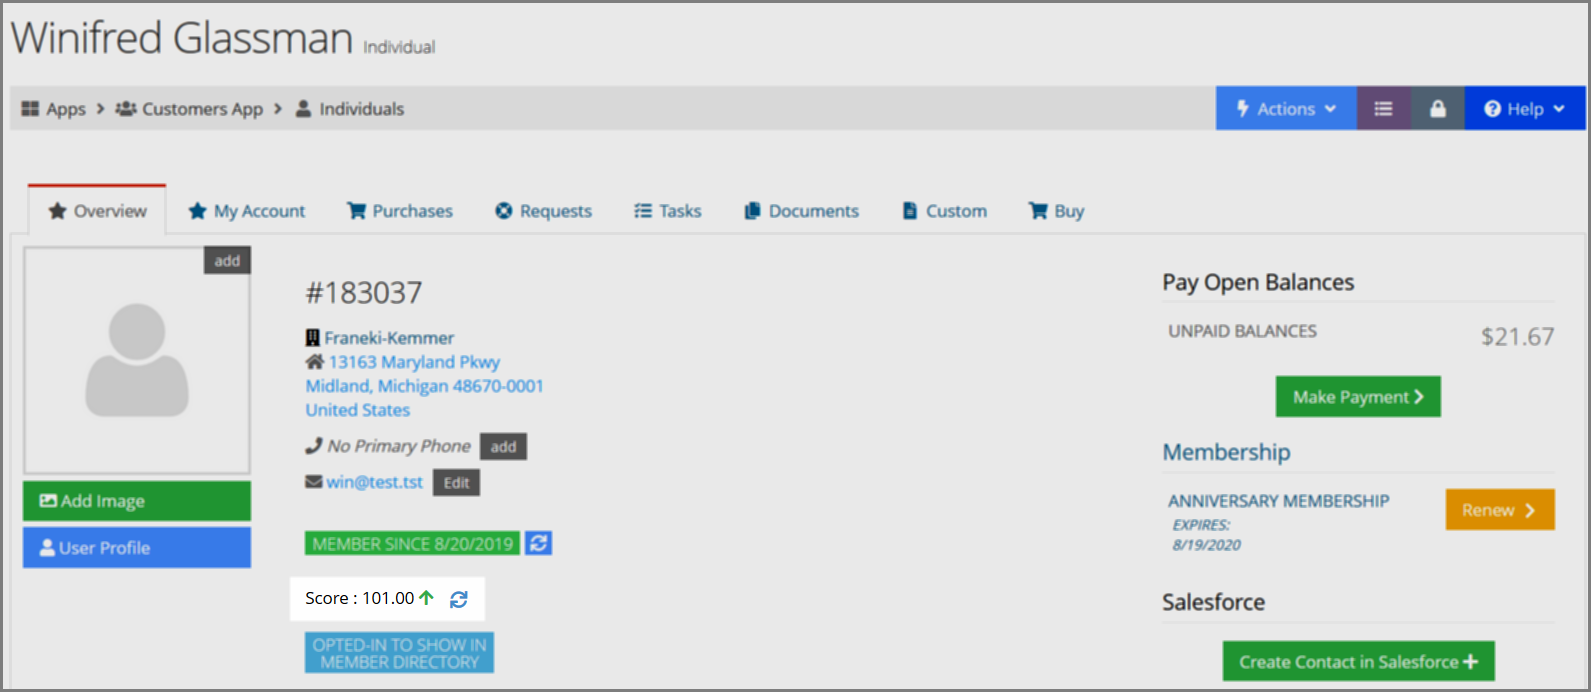
When a client meets the requirements configured to earn the score, it will appear on their Customer Record > Overview tab, as Score. This also indicates whether their score has been raised recently and gives the option to refresh to the latest score.
This score displays only for staff users. The score is updated on a weekly basis, but scores can be manually updated via the Customer Record > Overview tab, by clicking the refresh icon next to the customer’s score.
Committees
Configuring Itemized Forms in the Committee Record
Staff can associate itemized custom fields with a committee record.
- Navigate to the Committee Record > Details tab.
- Select the Itemize Custom Fields option.
- Click Itemize next to the custom form.
- Add custom fields to the form as normal.
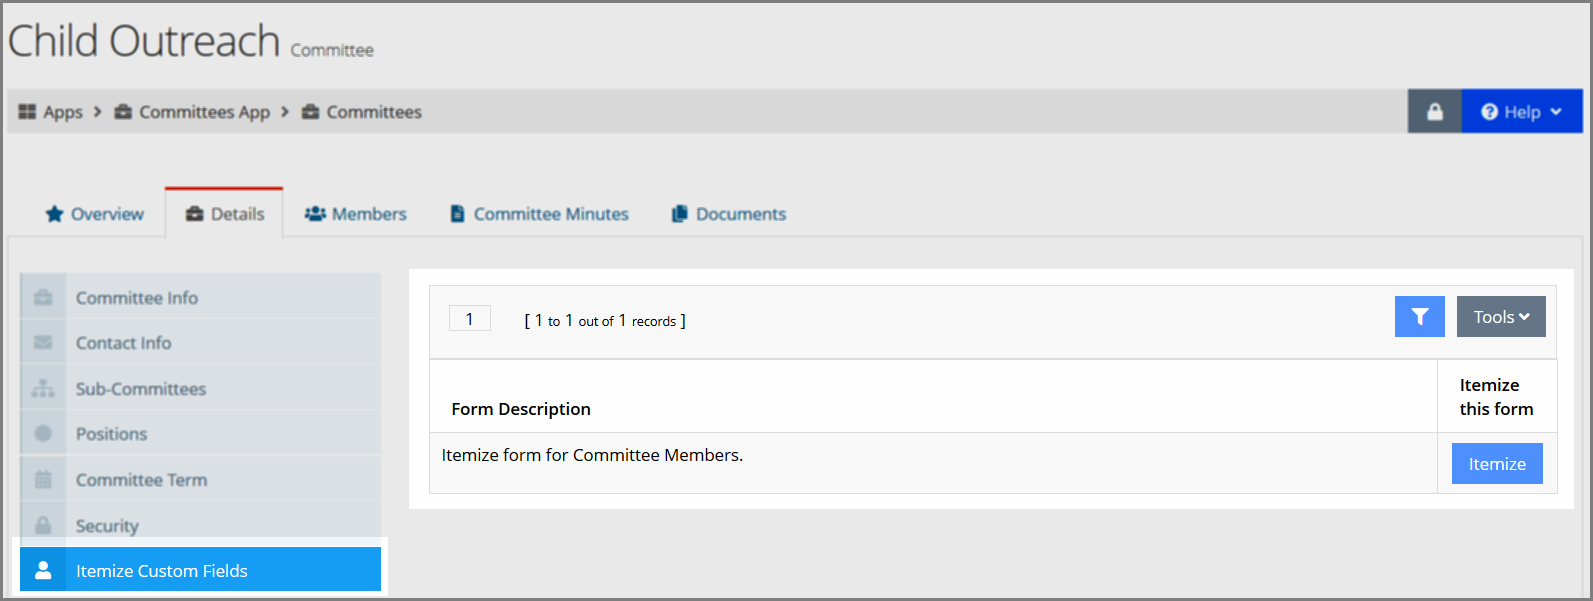
These custom fields will appear when and wherever a committee member is added to the committee, or if their information is edited. They can also be included in query searches and, by extension, the Committee Directory.
Customers
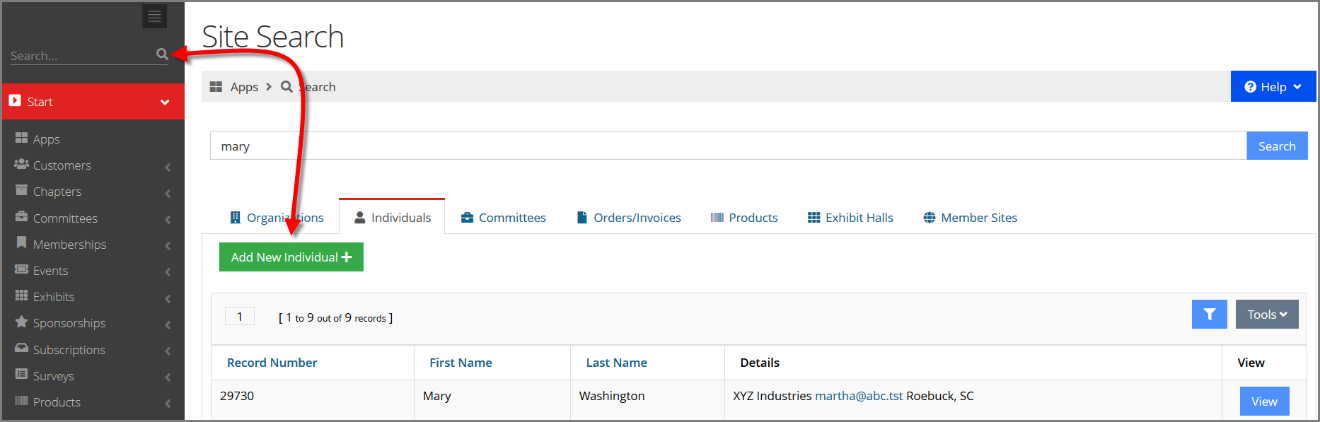
Adding Customer Records via Global Search Results
When using the global search, staff now see the option to add a new individual or organization from the results page.
Ensuring Primary Contact Method on the Customer Record
When adding a phone, email, or address to a customer record, if only one of that contact type exists it is automatically flagged as “Primary.” If two of a contact type exist and the current primary is deleted, the remaining contact type is automatically flagged as “Primary.”
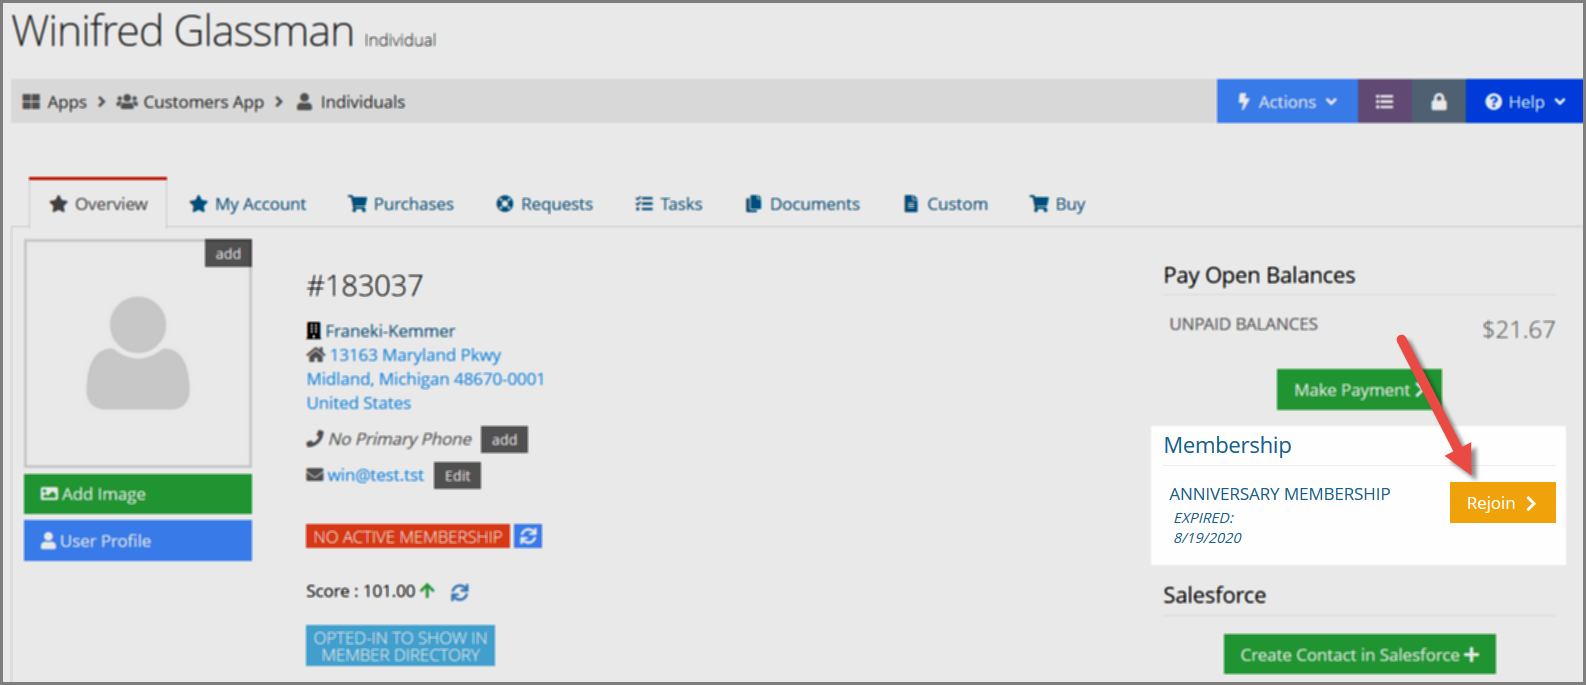
Configuring “Rejoin” to Appear on the Customer Record > Overview tab
For clients who wish to have the “Rejoin” option appear on the Customer Record > Overview tab, this can be enabled under the Configurations App, using the setting Show Terminated Memberships on Overview.
Archiving Email Addresses
When editing an email address on a customer record, the Archive option appears. If the email is in use or connected with any other record in the system (such as a committee membership), although staff will not be able to delete the email address, they will now be able to archive it.

A button offering the option to archive the email address also appears after a staff user has attempted to delete an email address that is in use.
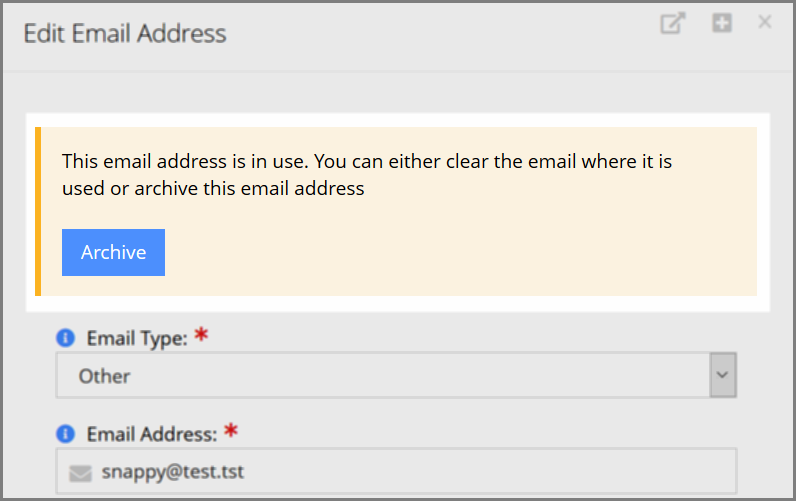
Once an email is flagged as archived, the “Archived” label appears below that email.
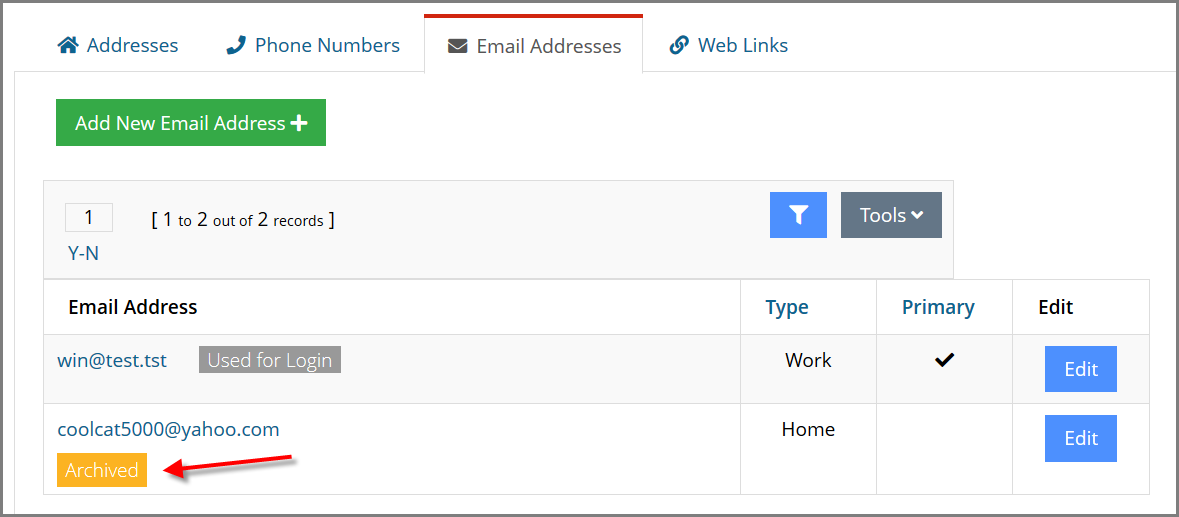
Archived emails cannot be used in any system actions, such as associating that email address to an individual’s committee membership or when selecting an email for confirmations. If the email address is used for login, it cannot be archived.
Impersonating Users
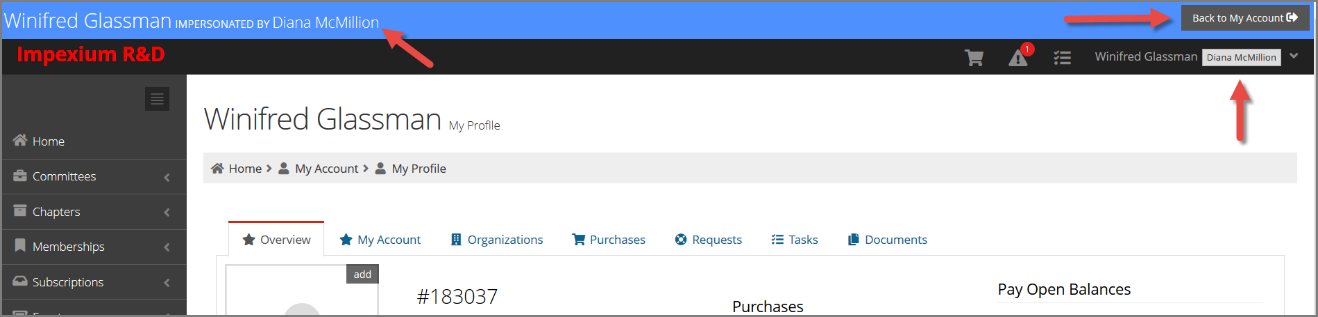
Staff can now be permitted to impersonate, or view the system as, another user. This setting is conferred by Role. When enabled, the option to login as another user is visible under the Individual Record > Actions drop-down, using the Login as… selection.

When impersonating another user, staff see messaging across the top indicating this, as well as the option to return to their own view of the system.
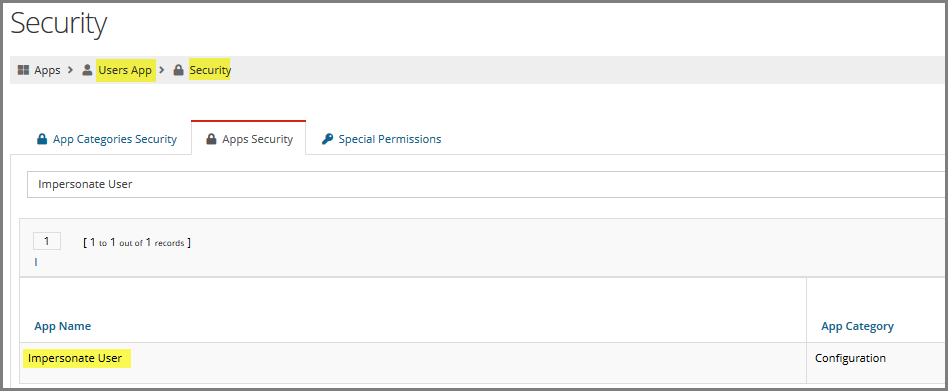
The ability to impersonate is configurable by staff role. For administrators configuring roles for staff, use the Impersonate User security setting to enable or disable this option for a role.
Purchasing an Application or Certification from the Organization Record > Buy Tab
The option to Purchase Application and Purchase Certification are now visible on the Organization Record > Buy tab.

eCommerce
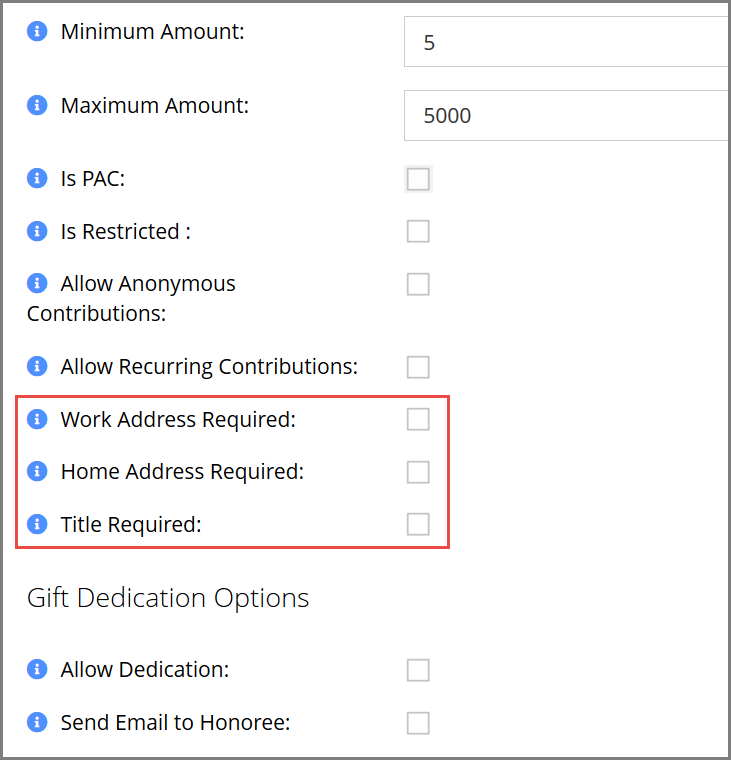
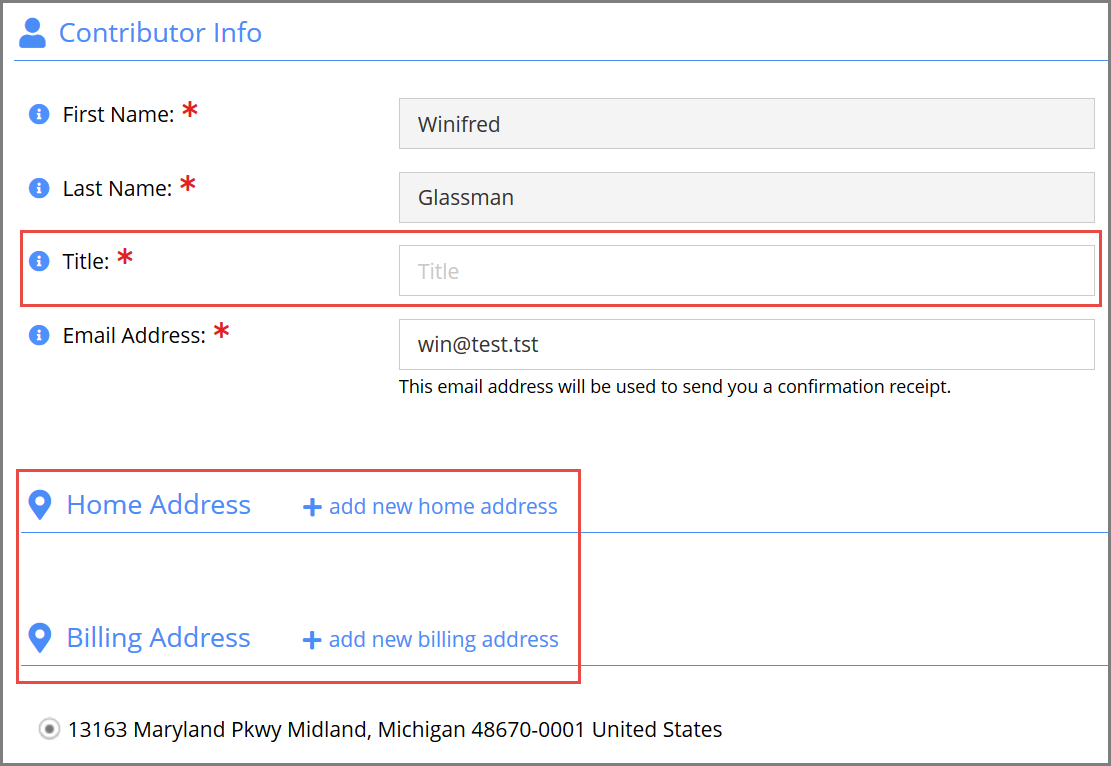
Requiring Address & Title Information on Fund & PAC Products
On fundraising products, staff can optionally require home address, work address, and/or title. If the fund is set as a related product, these fields are also required for checkout.
Configuring Suggested Products Appearing in Checkout
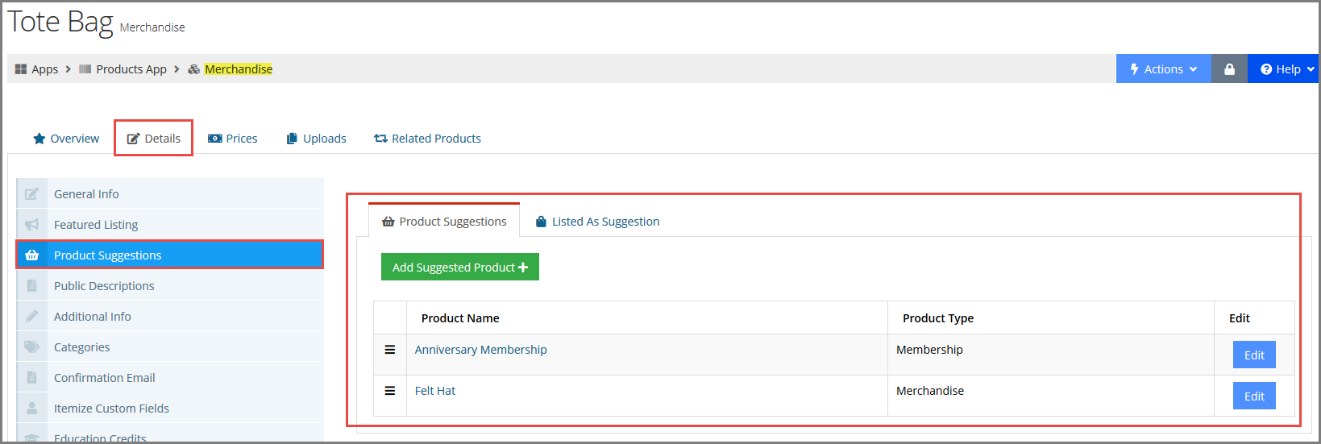
Staff can configure recommended products to appear when a certain product is purchased. This option is available on all product types (merchandise, memberships, events, etc.), under the Details tab > Product Suggestions menu option. At the time of this release, the configuration must be manually done by staff—automated product suggestions will be available in a future build.
In the Product Suggestions menu option, Product Suggestions tab, click the Add Suggested Product button. In the Add Suggested Product window, begin typing the name of the product to suggest in the quick lookup field and select from the list of suggestions.
Note the Listed As Suggestion tab: this tab lists all of the products to which the product being viewed is associated as a suggestion.
During checkout, related products appear in a carousel at the bottom of the purchase wizard—there is a maximum of 15 suggested products permitted.
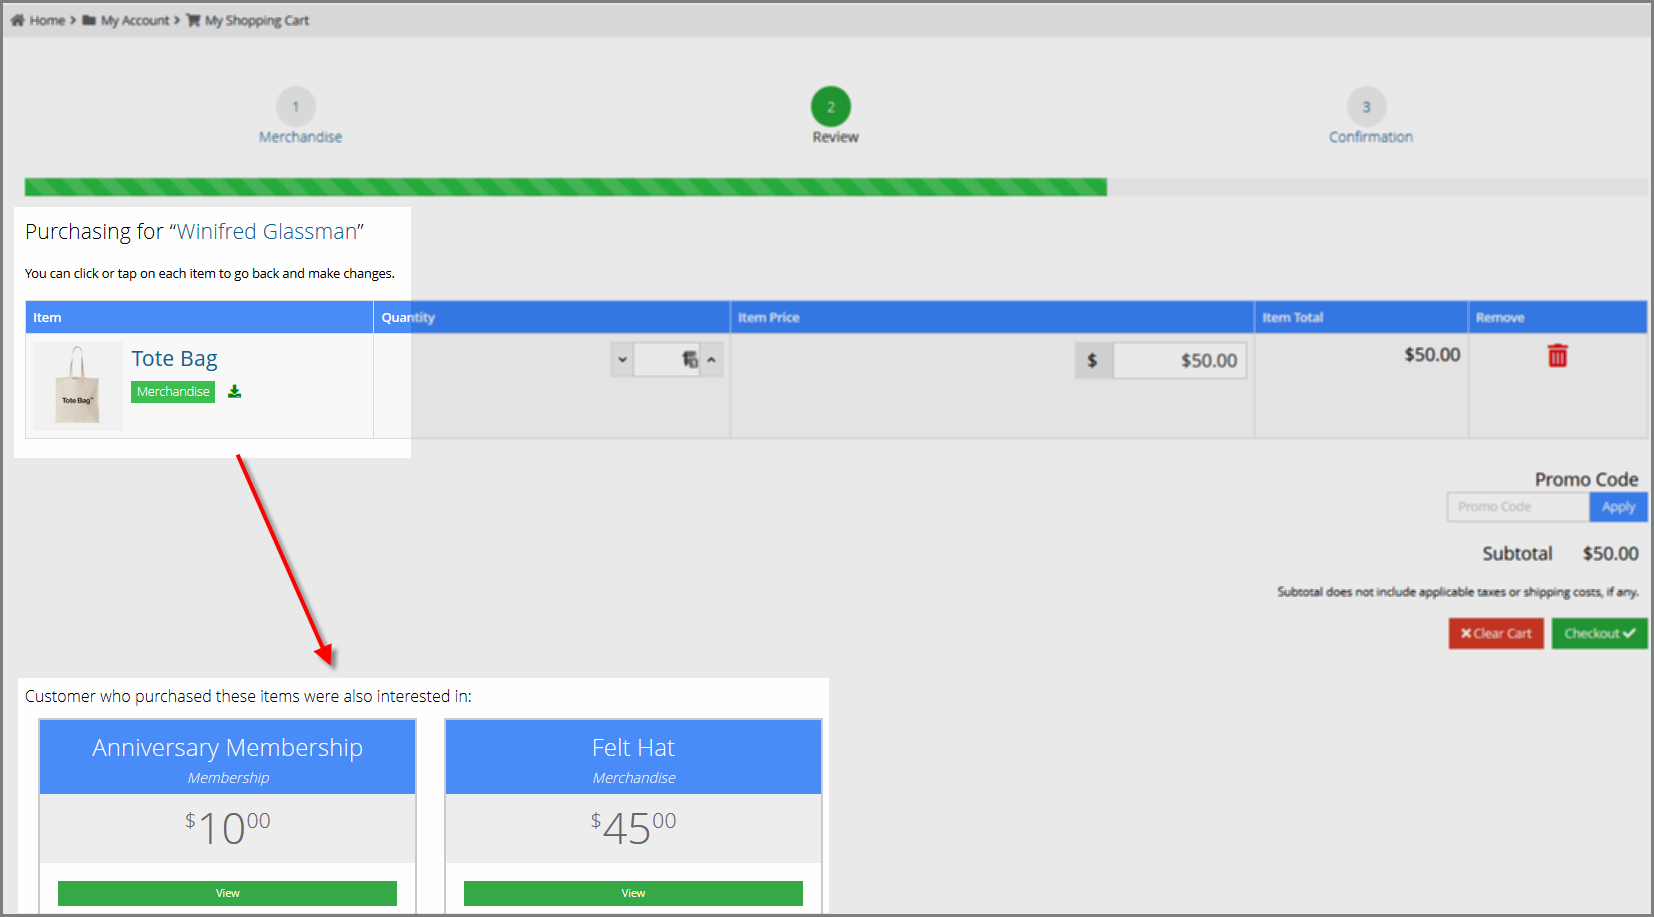
The text appearing above this section can be modified by navigating to the Configurations App and searching for the Suggested Products Caption field. The default text is “Customers who purchased these items were also interested in,” but staff can change this value to something else.
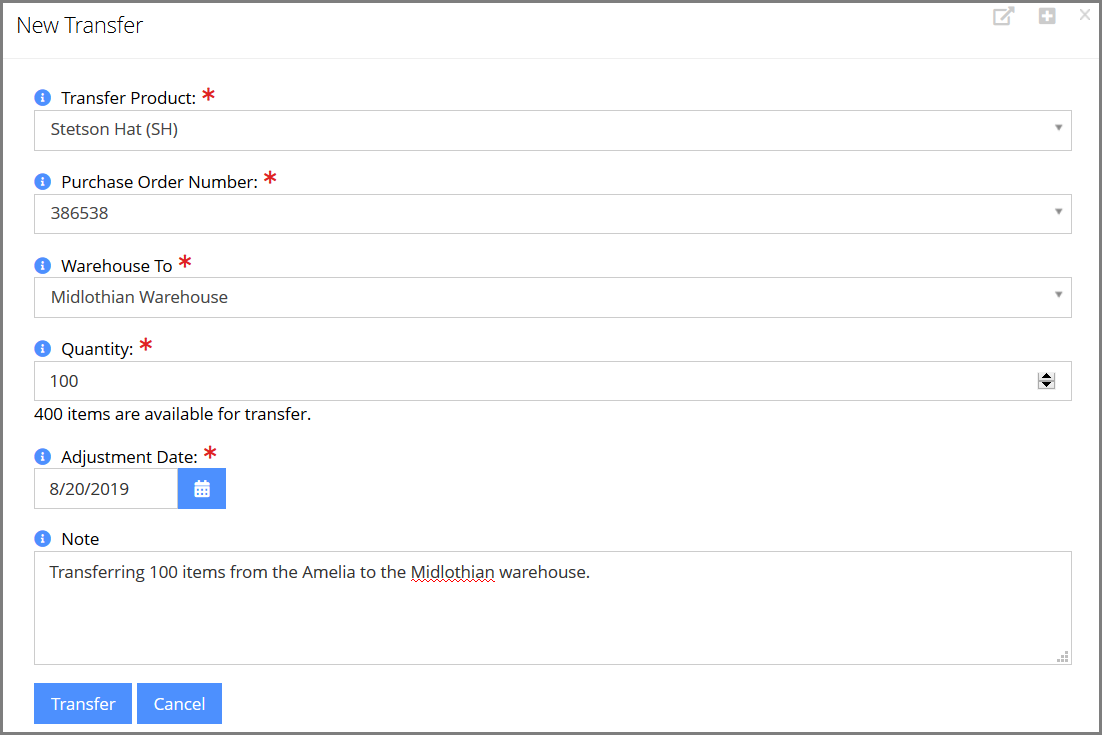
Transferring Product Between Warehouses
Product can now be transferred between warehouses.
- Navigate to the Inventory App > Warehouse feature.
- Open the Warehouse Record.
- Navigate to the Inventory tab > Transfers menu option.
- Click the Transfer button.

- In the New Transfer window:
- In the Transfer Product field, begin typing the name of the product to be transferred. This product must be in the warehouse whose record is being viewed.
- Begin typing the Purchase Order Number. This must be an existing purchase order that contains the product to be transferred.
- Under Warehouse To, begin typing the name of the warehouse to which product is being transferred.
- In Quantity, enter the quantity to transfer.
- Specify an Adjustment Date.
- Enter a Note if desired.
- Click Save.
eMarketing
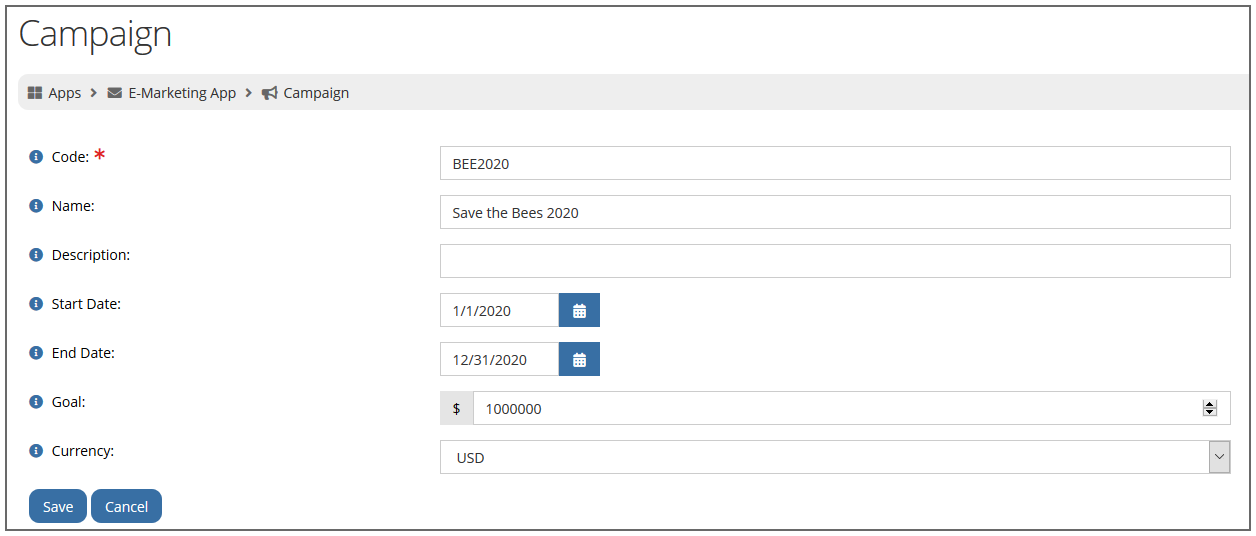
Associating Transactions with an eMarketing Campaign
Staff can now associate transactions with an eMarketing campaign.
- Navigate to the eMarketing App > Campaign.
- In the Add New Campaign form, enter required campaign information and click Save.
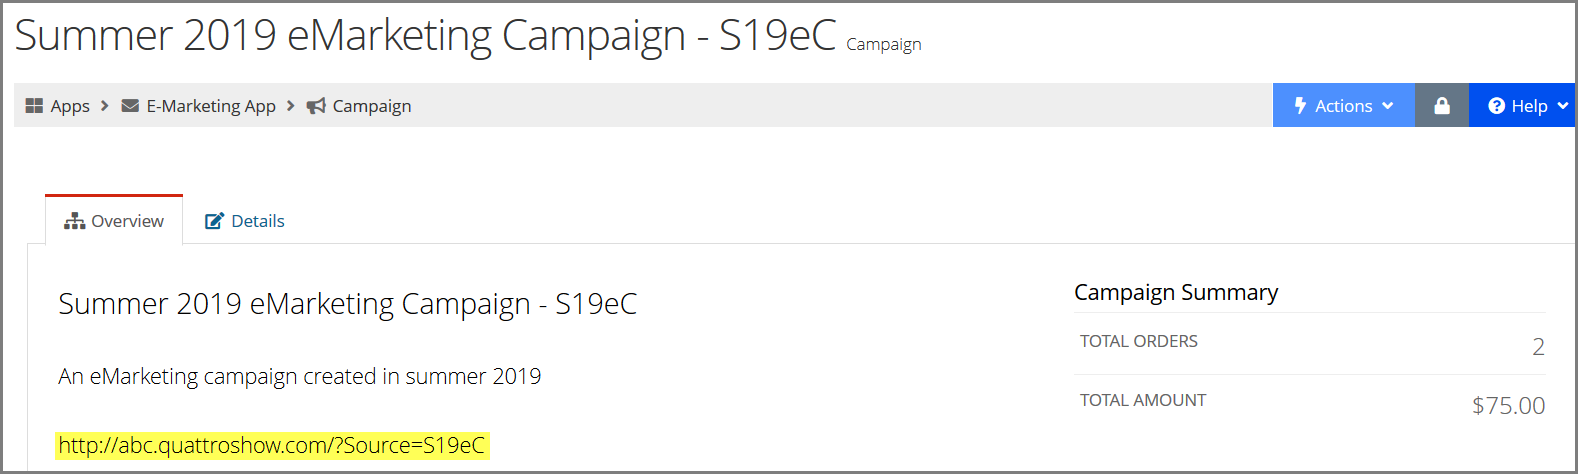
In the saved record, staff will find a URL in the Overview tab—this can be shared with non-staff users, and purchases they make after navigating to this URL will be recorded under the Campaign Record.
Administrators, please note that you can edit the term “Source” (example seen in the highlighted URL below) to different terminology if you wish. This setting is under the Configurations App > Settings, using the Campaign Query String Parameter setting. Source cannot include spaces or special characters.
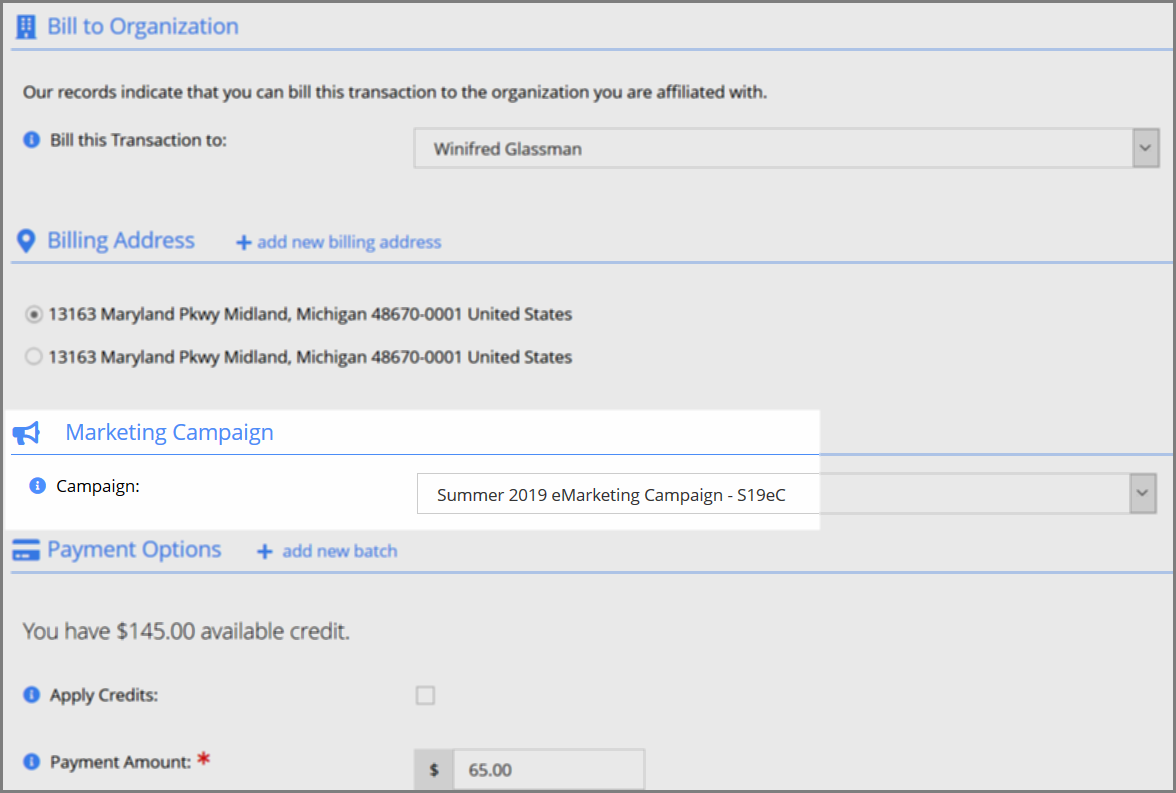
Staff have the option of simply selecting the necessary Campaign during checkout.
Creating Campaigns Automatically
Campaigns in your instance of re:Members AMS can be configured to be created automatically. For administrator users, this yes/no setting can be found in the Configurations App > Settings using Auto Create Campaign.
Enabling this allows for the automatic creation of a campaign when the site URL contains a campaign code during the purchase process. For example, see the following URL:
https://members.myassociation.com/anypage?source=[sourcename]
The inclusion of “?source=[sourcename]” causes the system to create a campaign using the source passed through in the URL—in this example, the portion of the URL within brackets. Source name cannot include spaces or special characters.
Events
Selecting “Other” as Event Provider in re:Members AMS Event Record
For clients using an event provider not listed in the re:Members AMS Event Record, the option is now available to choose “Other” as the event provider.
This option is available under the Event Record > Details tab > Additional Info menu option, via the External Event Provider field.
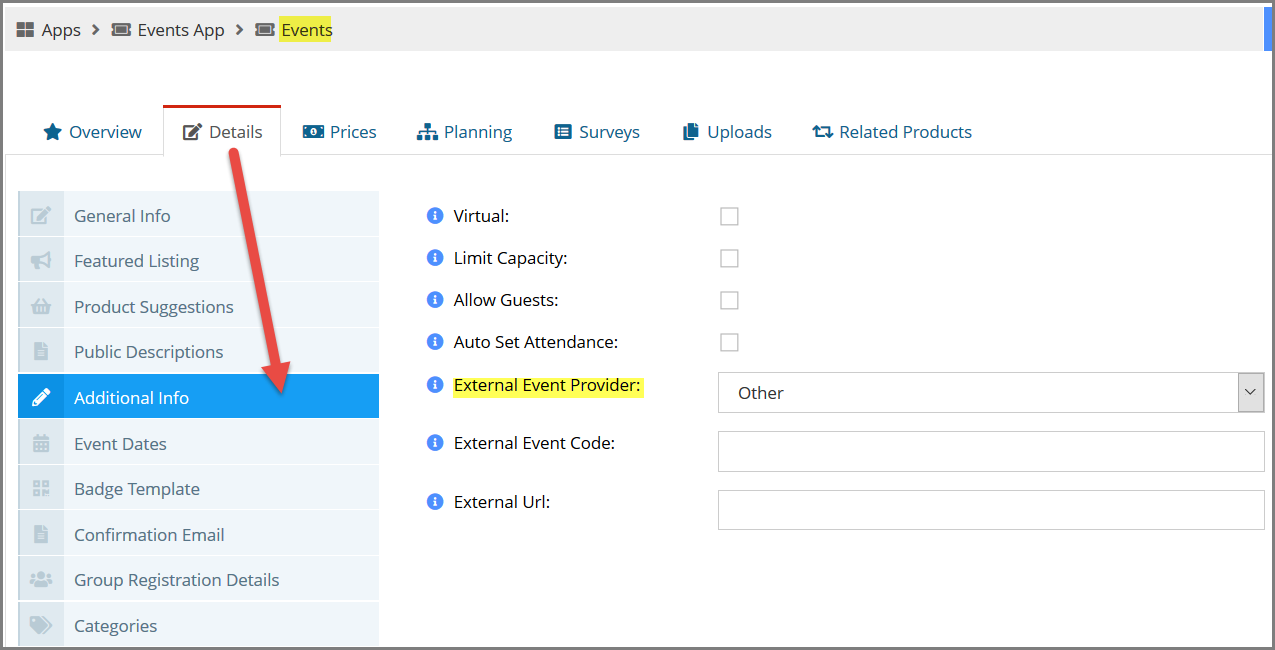
When “Other” is selected in the External Event Provider field, the External Event Code field displays, allowing staff to enter the related external event code.
When this option is enabled on the Event Record, any sessions created under the event will display the External Code field under the Session Record > Details tab > Additional Info menu option.
Linking to an External URL via the Upcoming Events Page
For clients who wish to link to an external URL via the re:Members AMS Upcoming Events list, configure the event in the following manner:
- Do not configure any price for the event. There should be no active price, because in this configuration there is no checkout via re:Members AMS.
- In the Event Record > Details tab > Additional Info menu option, enter the URL the customer should be redirected to in the External URL field. This can be any URL necessary.
With this configuration the event appears in the Upcoming Events page, but when a user clicks Register to Attend, they are redirected to the URL indicated in the External URL field.
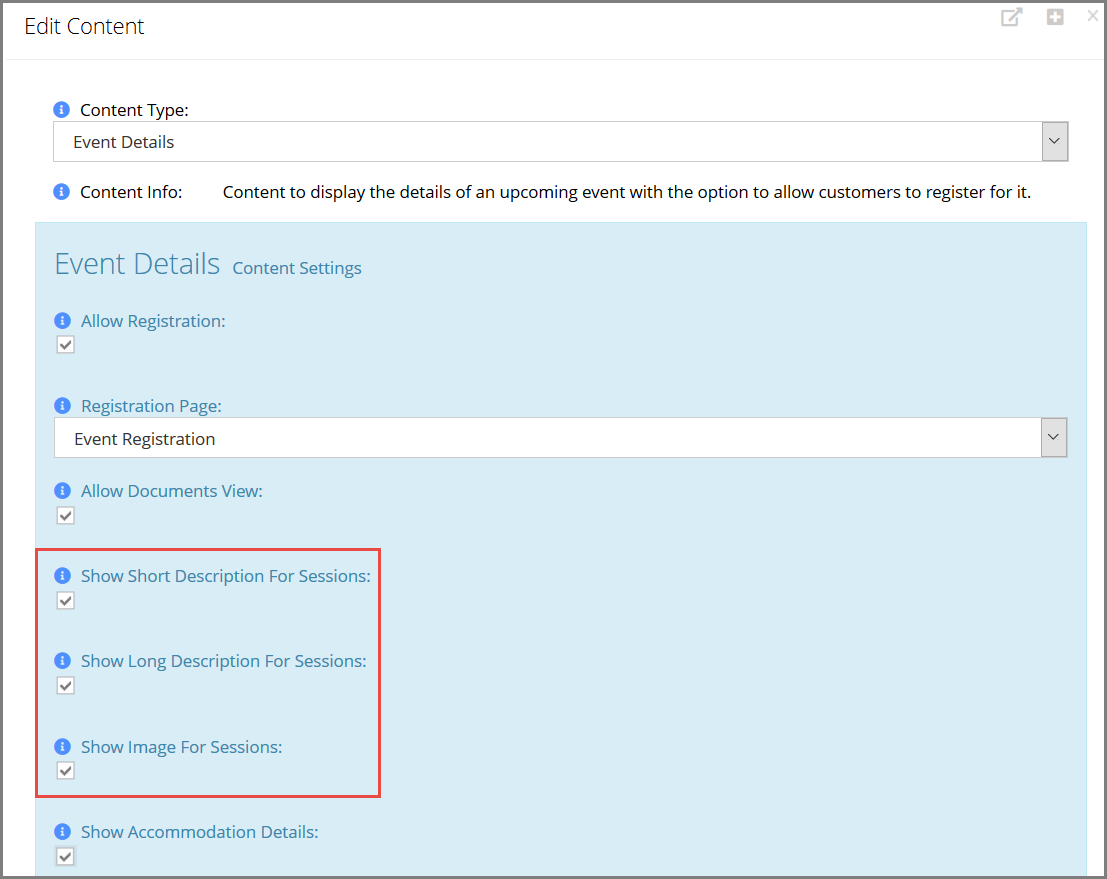
Showing Additional Session Detail on the Event Detail Page
Pages using the Event Details content item can be configured to display additional information about event sessions. Access these configurations by opening page settings for the event details page and editing the Event Details content item. New settings include:
- Show Short Description for Sessions
- Show Long Description for Sessions
- Show Image for Sessions
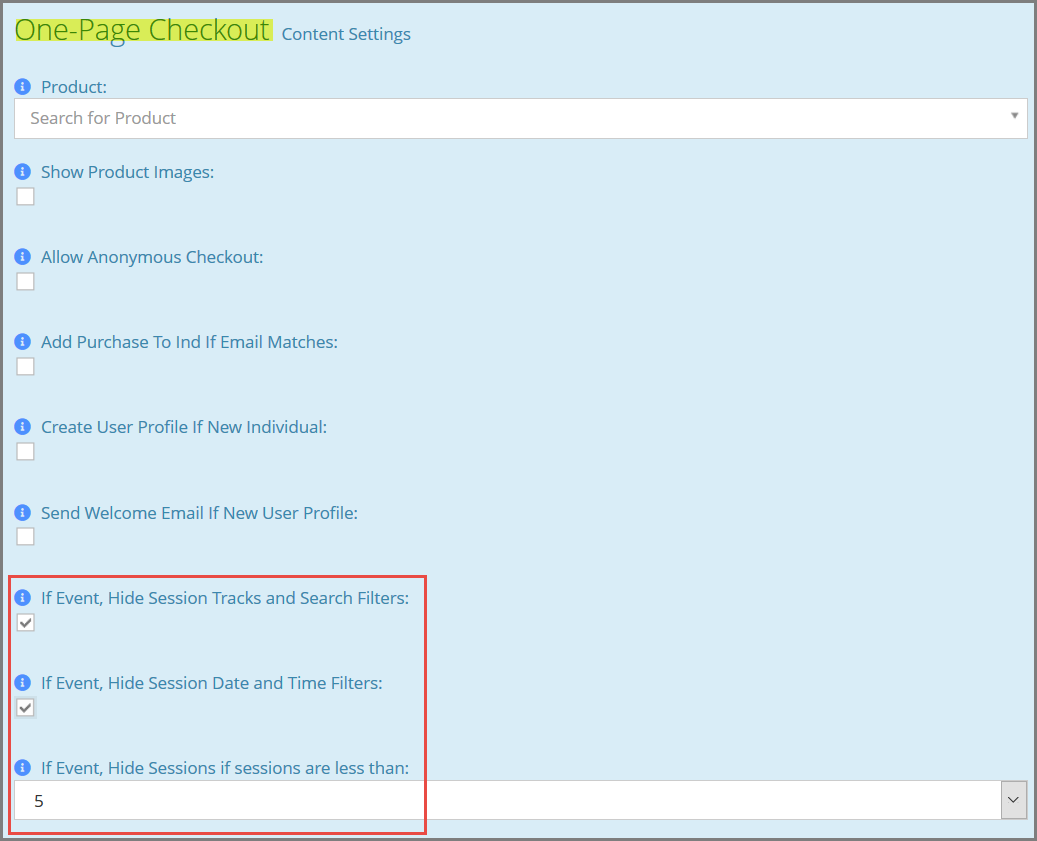
Configuring Additional Event-Specific checkout Options
Additional event registration configurations are available for two of the event registration content types: One-Page Checkout and Event Registration Wizard. The options are the same on both web page content types.
These settings permit users to hide levels of session information specifically for one-page event registrations.
- If Event, Hide Session Tracks and Search Filters
- If Event, Hide Session Date and Time Filters
- If Event, Hide Sessions if Number of Sessions is Less Than…
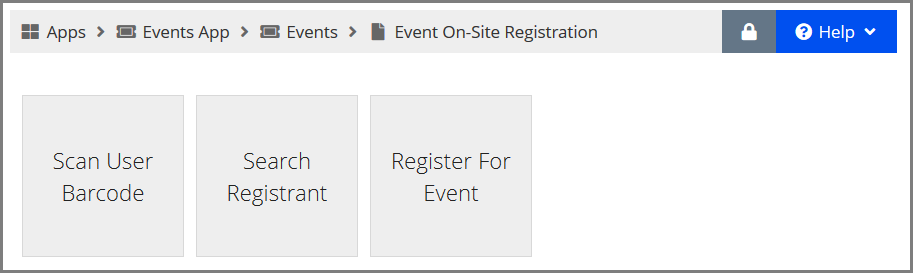
Using the “On-Site Registration” Panel
On the Event Record > Overview tab, an On-Site Registration link is available to allow staff easy access to several frequently used actions.
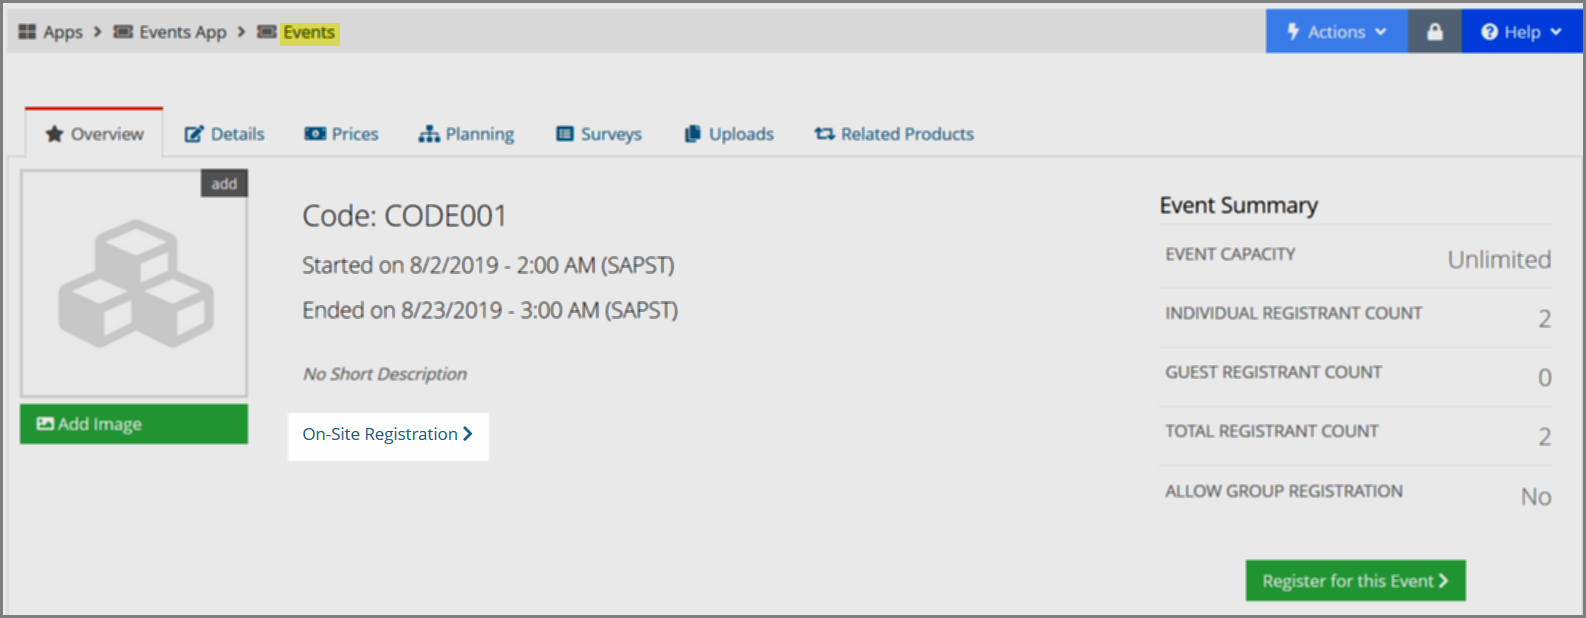
The panel that loads displays the following options:
- Search Registrant
- Register for Event
- Scan User Barcode
Additional options will become available in future builds.
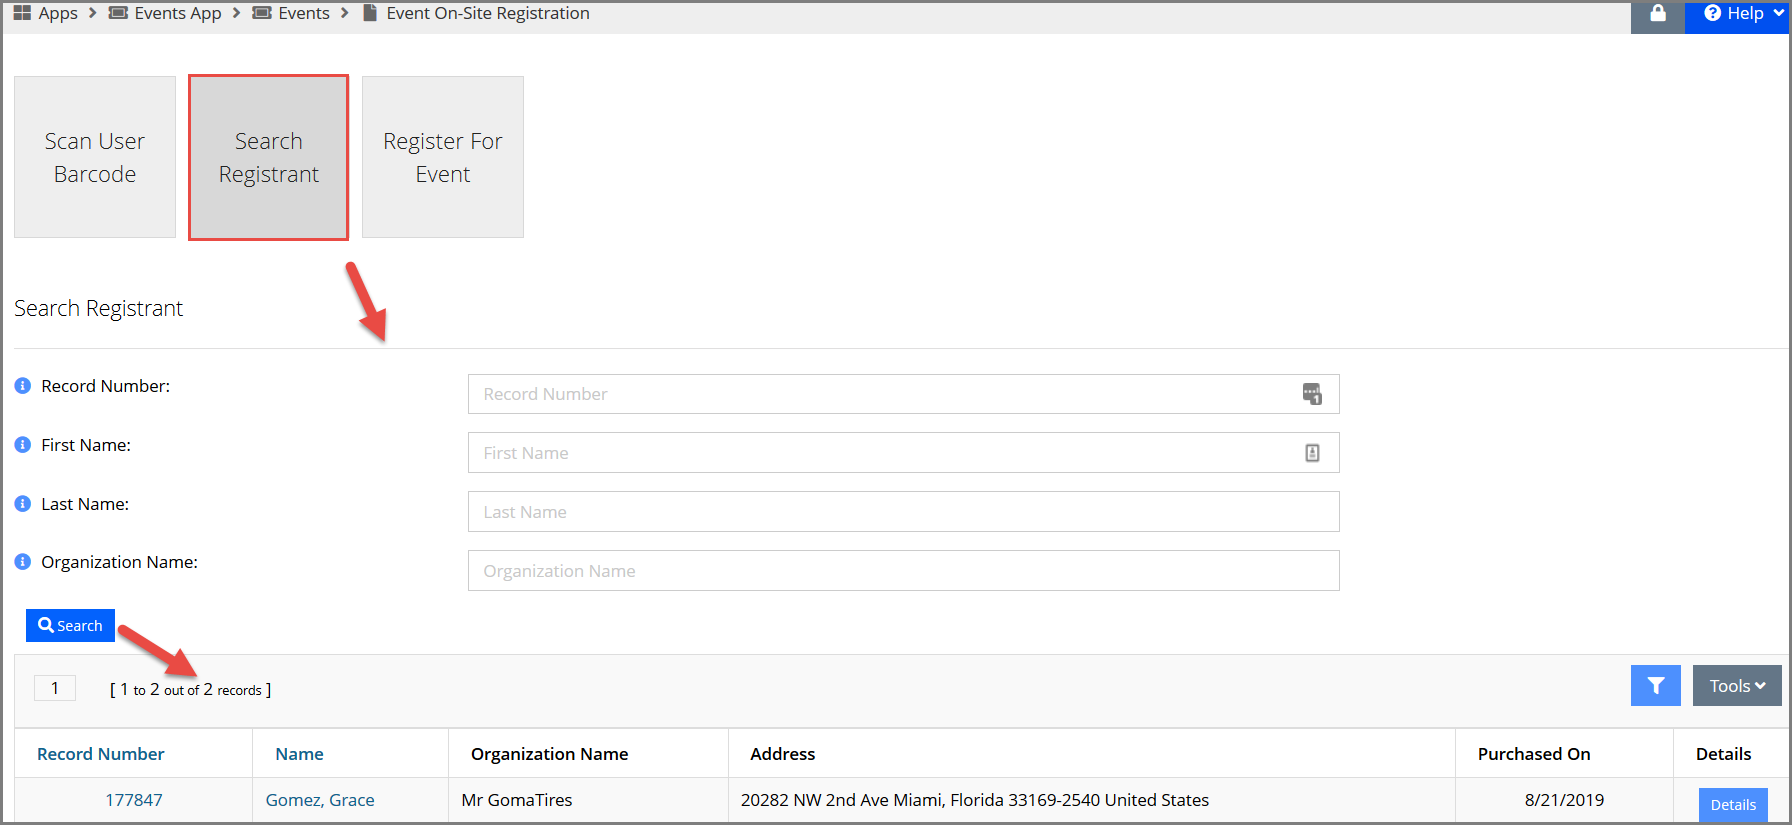
“Search Registrant” Option
“Search Registrant” allows staff to search for registrants of the event being viewed. Click the registrant record number or registrant name to open the Individual Record in a new tab.
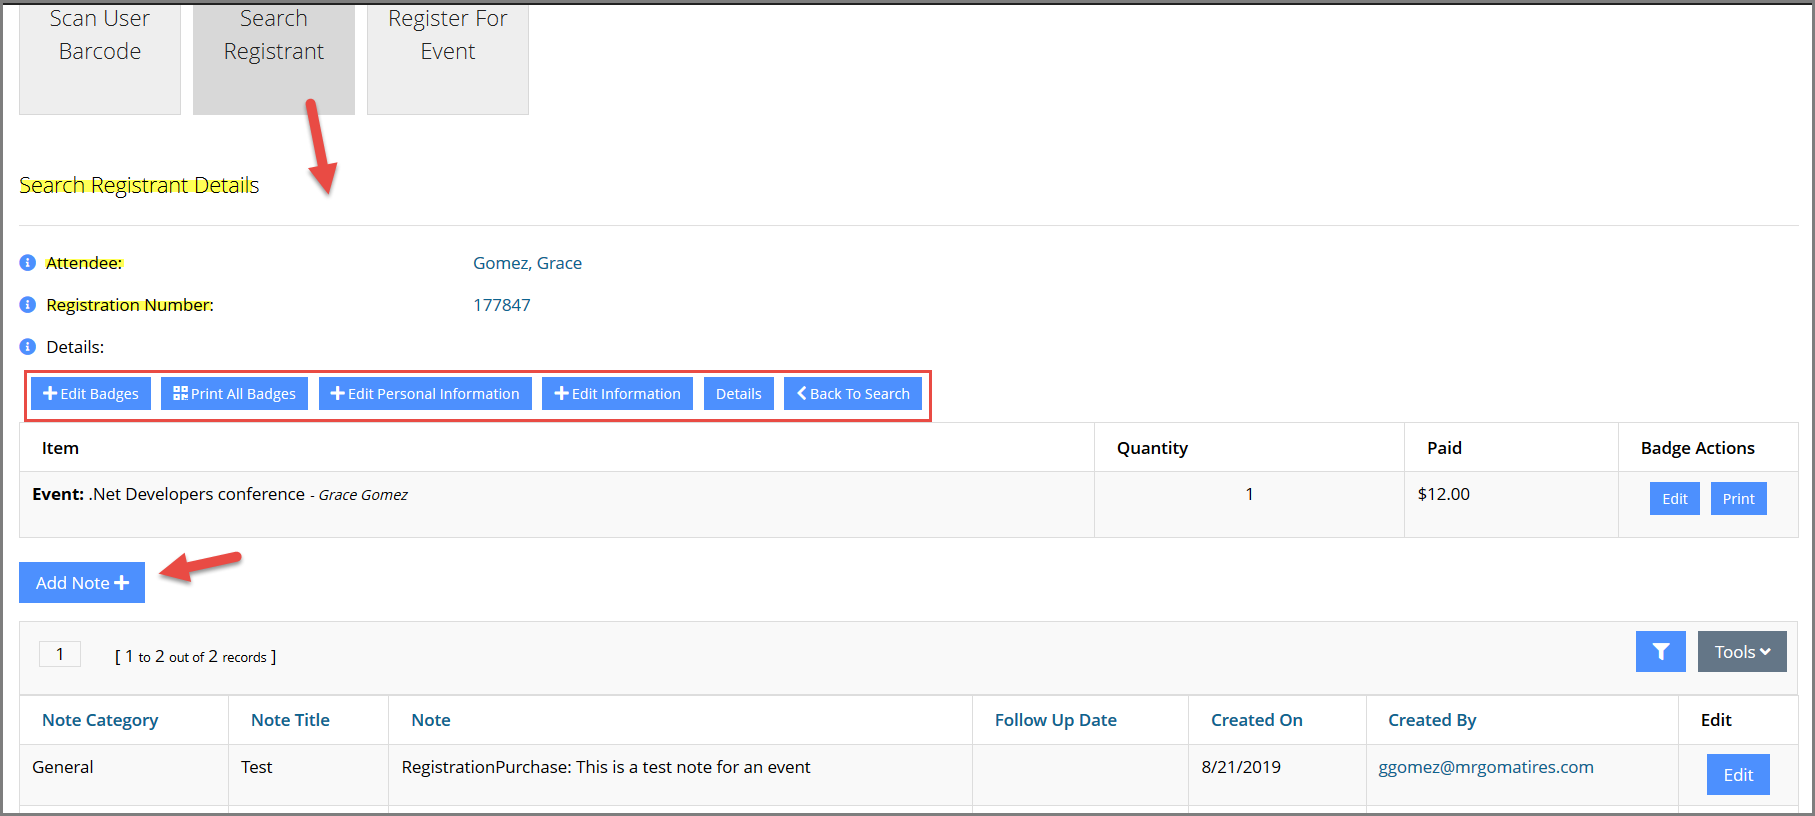
If the Details button is clicked, a table loads showing all that individual’s event and session registrations, allowing staff to create notes, edit and print badges, edit information on the Individual Record, or return to the search page.
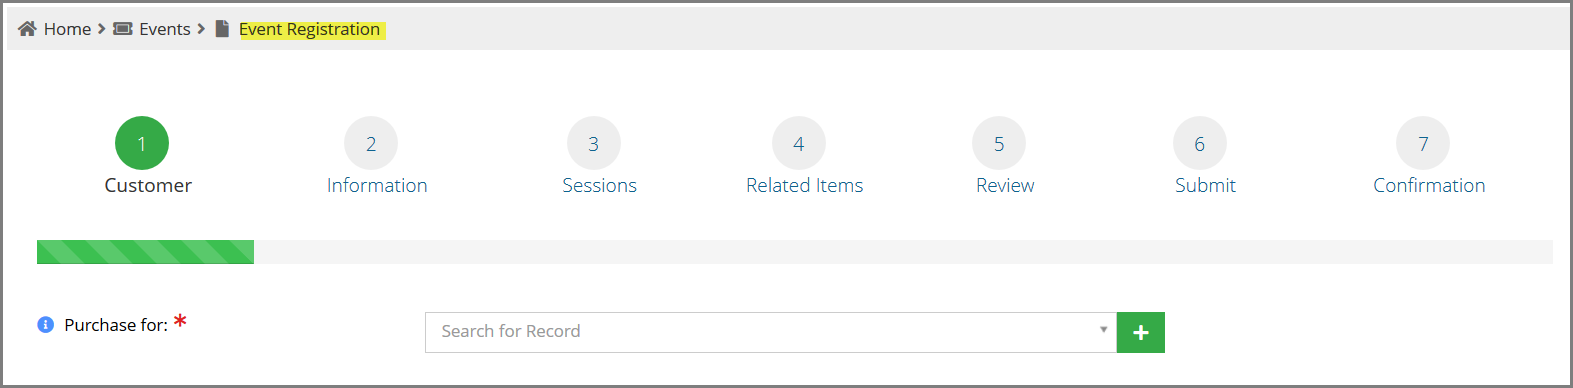
“Register for Event” Option
Opens the Event Registration Wizard in a new browser tab.
“Scan User Barcode” Option
On this screen, staff can scan a registrant’s bar code (that is, their QR code). Doing so passes the registrant’s record number into the system and automatically marks them as having attended the event.
Note that a physical barcode scanner is required for this functionality (that is, barcode-scanning mobile apps cannot be used).
Setting Badge Printing Restrictions
Badges can be configured to restrict printing to only certain user types and can require the user to submit a reason for printing the badge. Options on the Event Record > Account tab > Badges menu option include:
- Allow Registrants and Staff to Print – Reason not Required
- Allow Registrants and Staff to Print – Reason Required
- Allow only Staff to Print – Reason not Required
- Allow only Staff to Print – Reason Required
- Do Not Allow Badge Printing

Requiring the badge reason is only in place when printing a one-off badge, not for a mass printed badge list.
If the registrant can print a copy of their badge, they will see the option to do so from the Event Registration Detail page, accessible via the My Profile page, under Purchases > Events.
Badge print reasons can be configured by staff under the Events App > Setup > Badge Print Reason menu option. Only reasons flagged as Is Public will be visible to registrants (non-staff).

Configuring & Assigning a Badge Print Fee
A badge printing fee can now be assigned to an event. Access this functionality under the Event Record > Prices tab > Misc Fees menu option. A Badge Print Fee button is available.
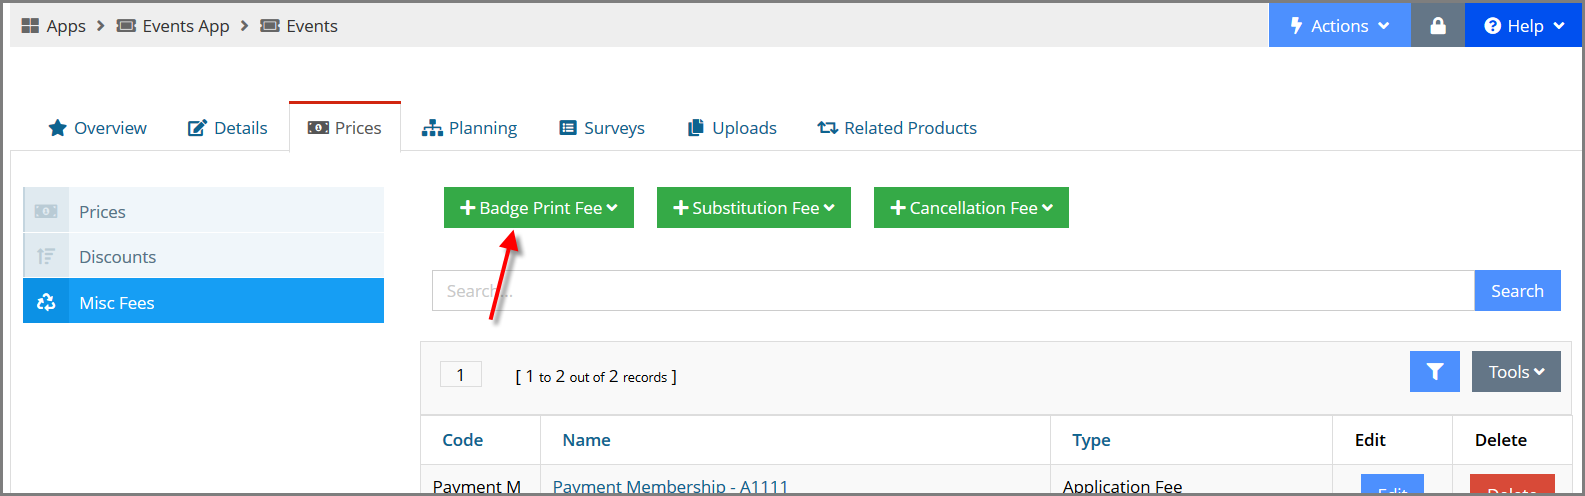
Badge print fees are created as the “Miscellaneous” fee type. They’re visible under the Products App > Setup feature > Miscellaneous Fees menu option.
Exhibits
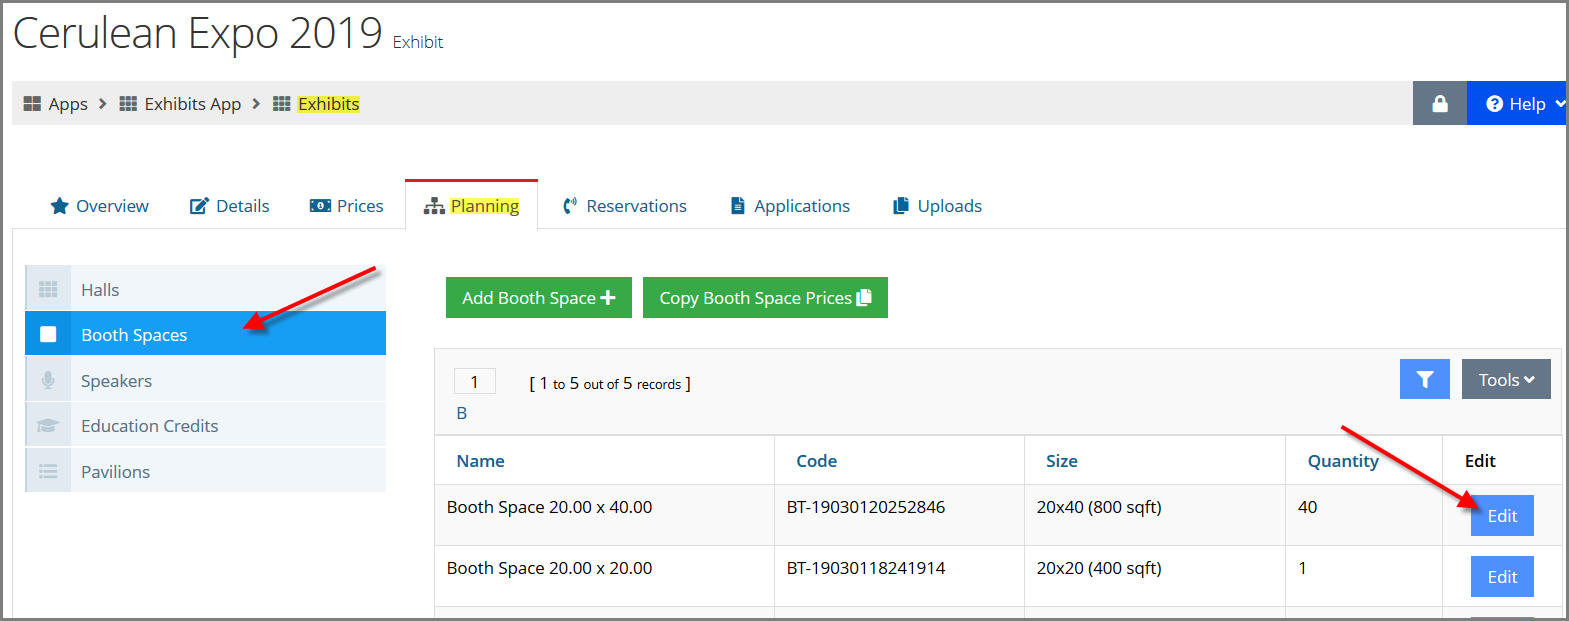
Including Related Products with a Booth Space
Once booths have been created or imported in an Exhibit Record, related products can be associated with all booths of a certain space/type. To find this feature,
- Open the Exhibit Record > Planning tab.
- Select the Booth Spaces menu option.
- Locate the desired booth space and click Edit.
- In the Booth Space Record, click the Related Products tab. Add desired products to the booth space.
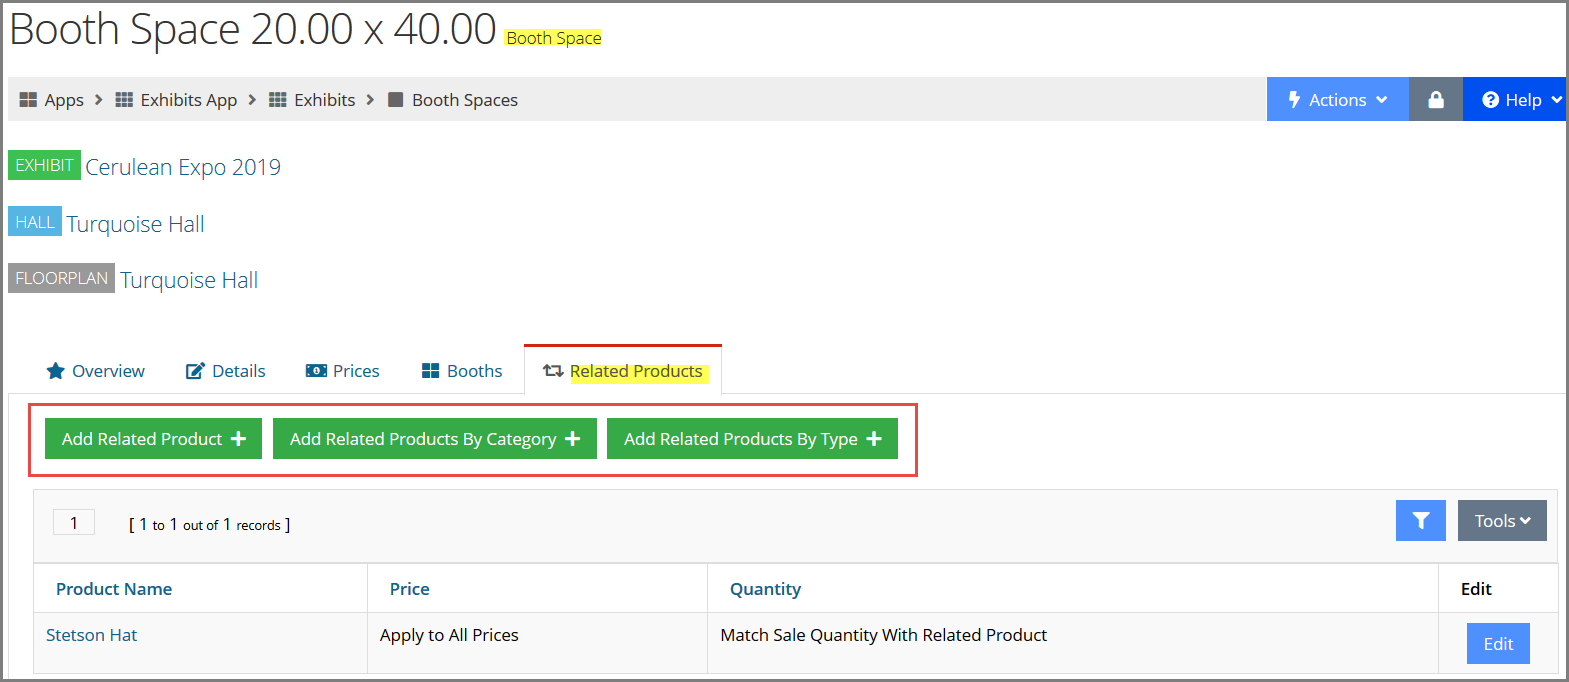
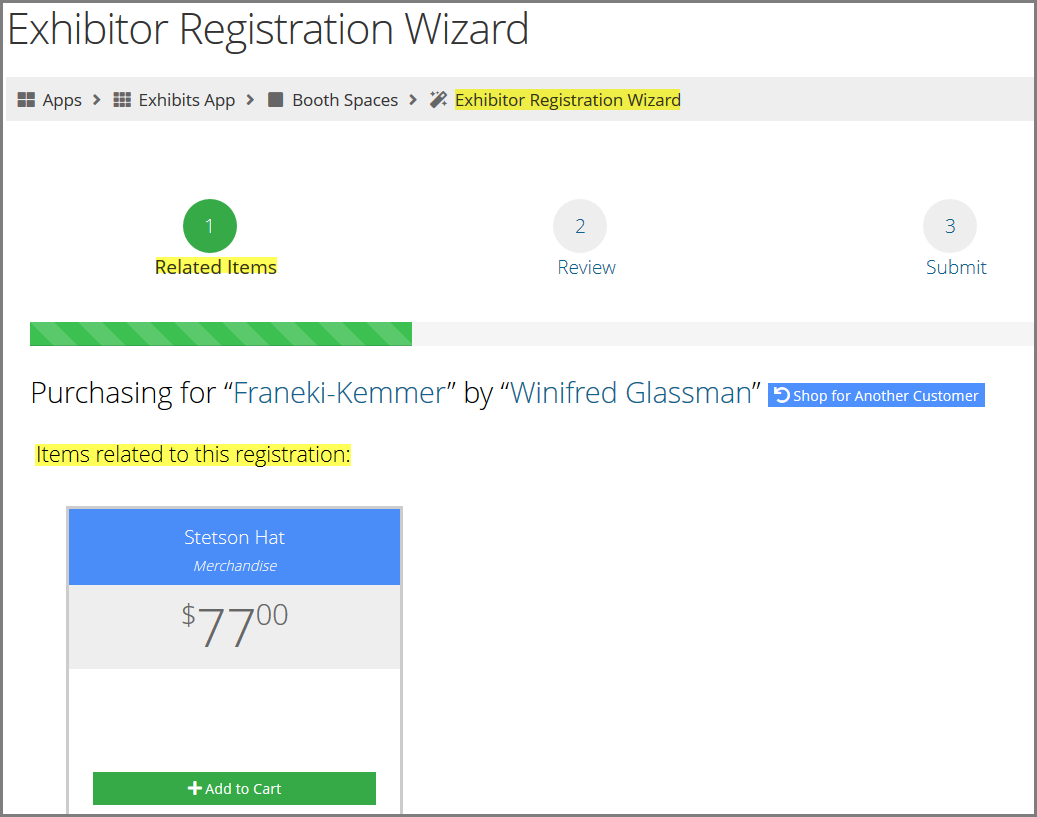
When customers select products of that booth space type, a section for Related Items appears, allowing selection from any related items added to that booth space.
Fundraising
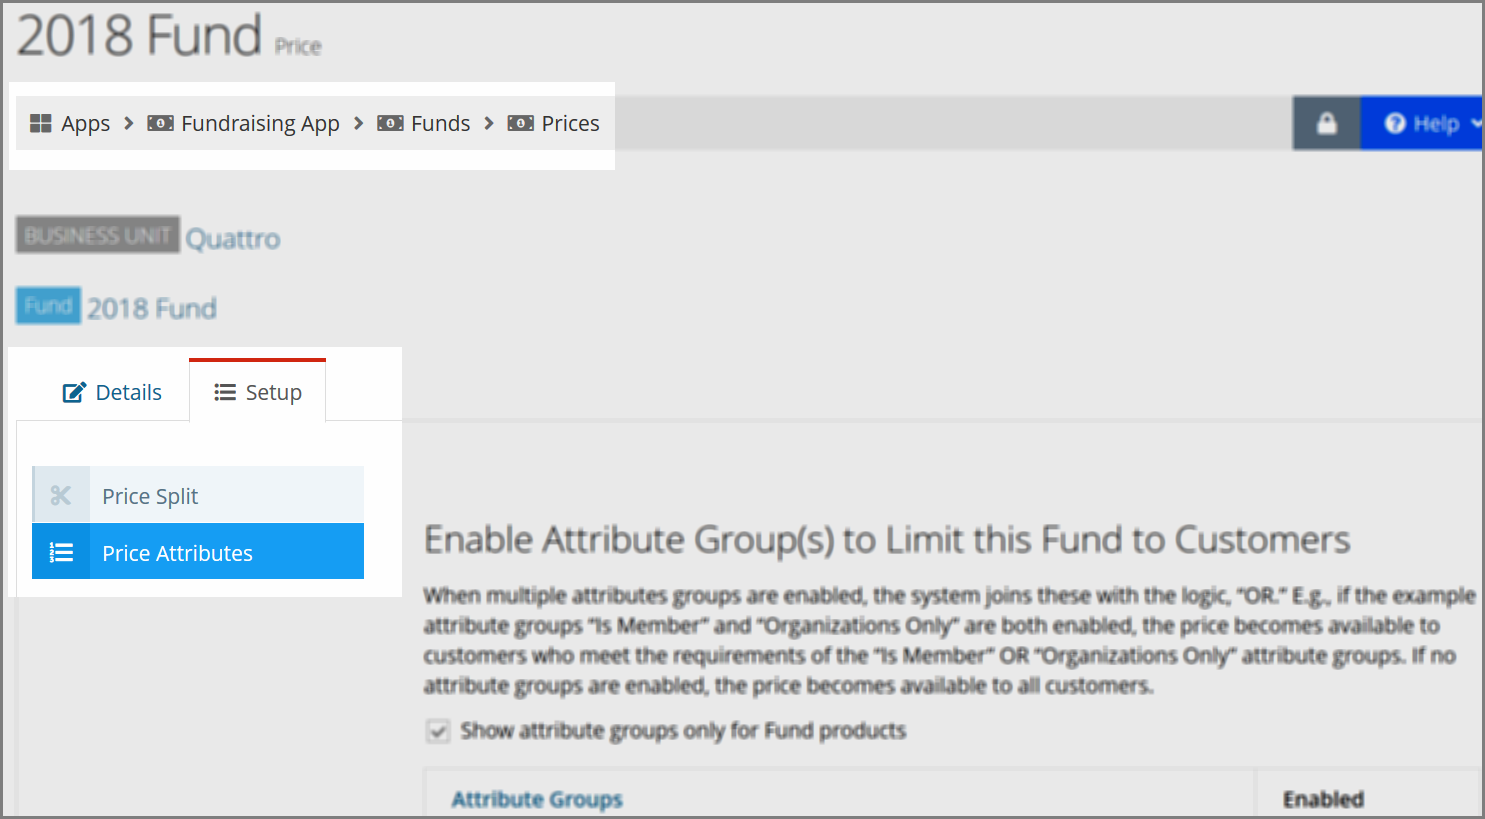
Configuring Price Attributes for Fundraising Products
Fundraising and PAC products now permit prices set up using standard price attribute functionality. This can be used to ensure that only customers meeting attribute requirements can see and donate to the fund.
Currently guest users (users that are not logged in) can still see the fund.
Configuring Itemized Fields for Fundraising Products
Funds and PACs can be set to display custom fields. This functionality is accessible under the Fund or PAC record > Details tab > Itemize Custom Fields menu option.
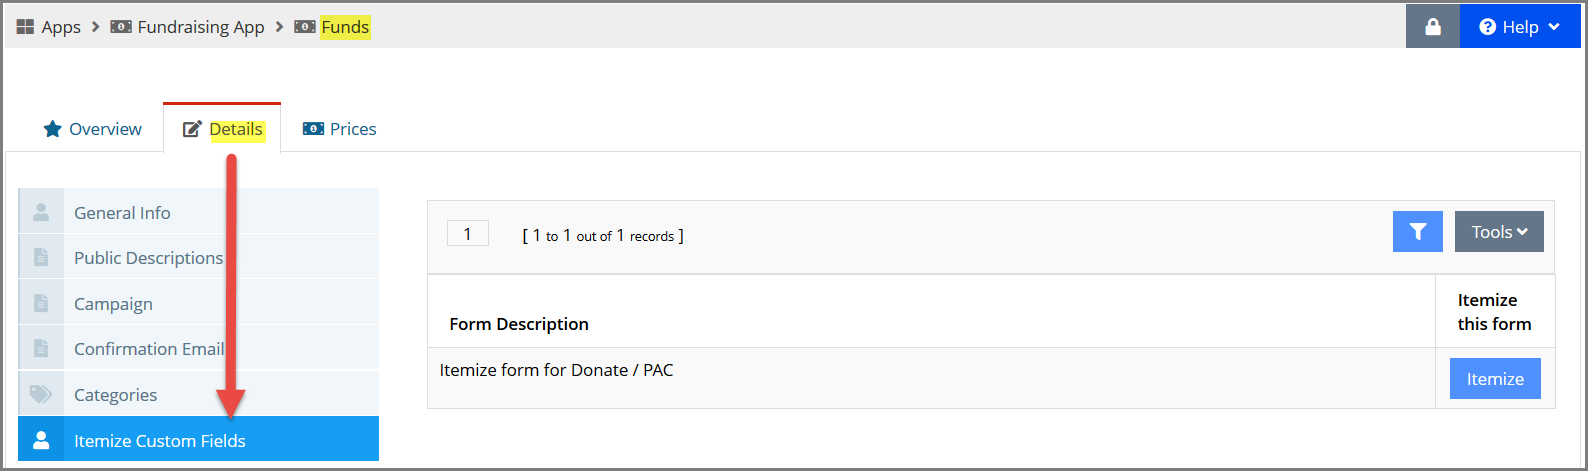
These fields display in the Donate Now page and are queryable.
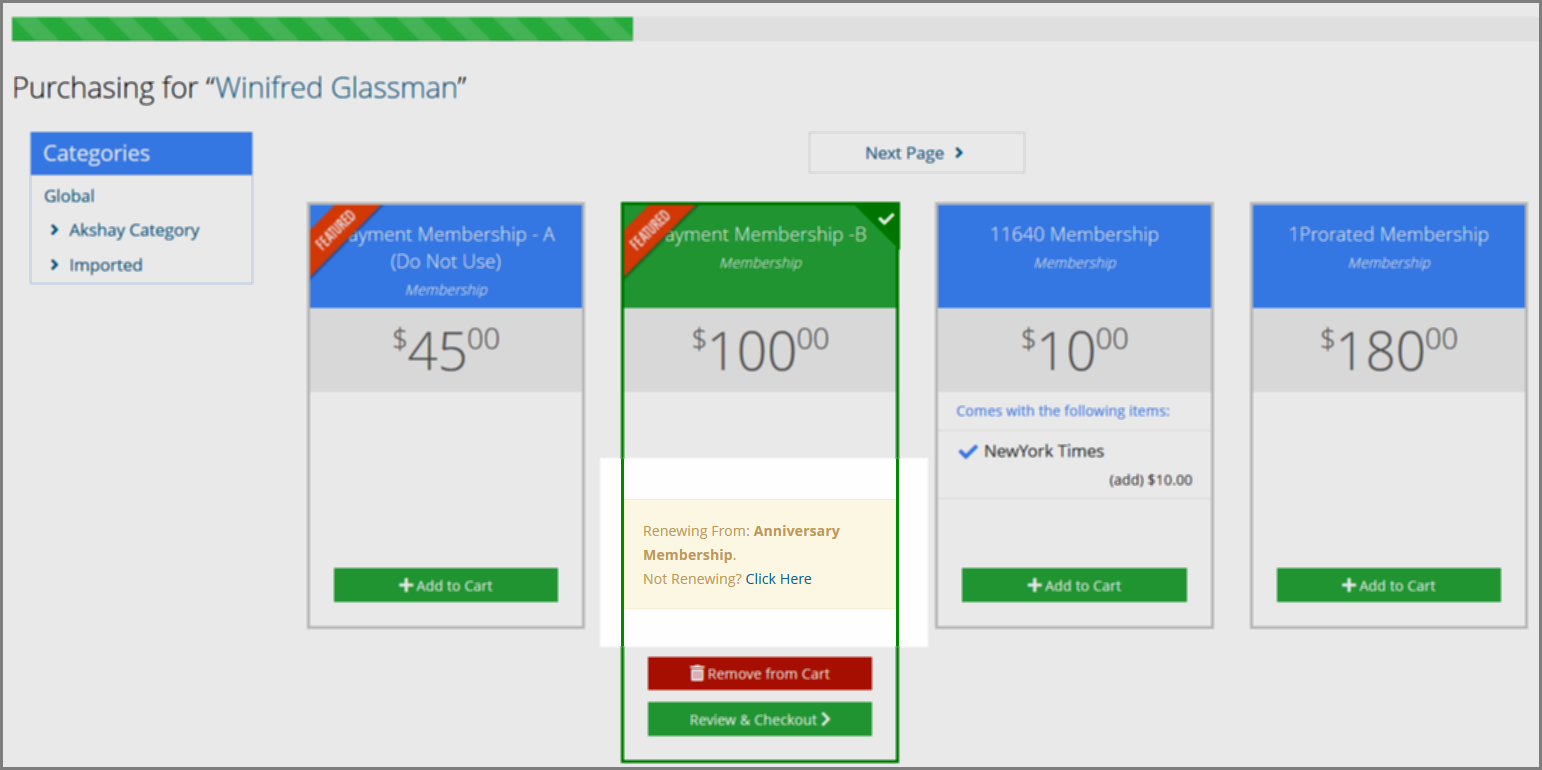
Displaying the Option not to Renew from Previous Membership
When a customer has an existing membership and selects another or is purchasing a membership and adds another to the cart (as with a chapter membership), the system offers users the option not to consider the membership a renewal.
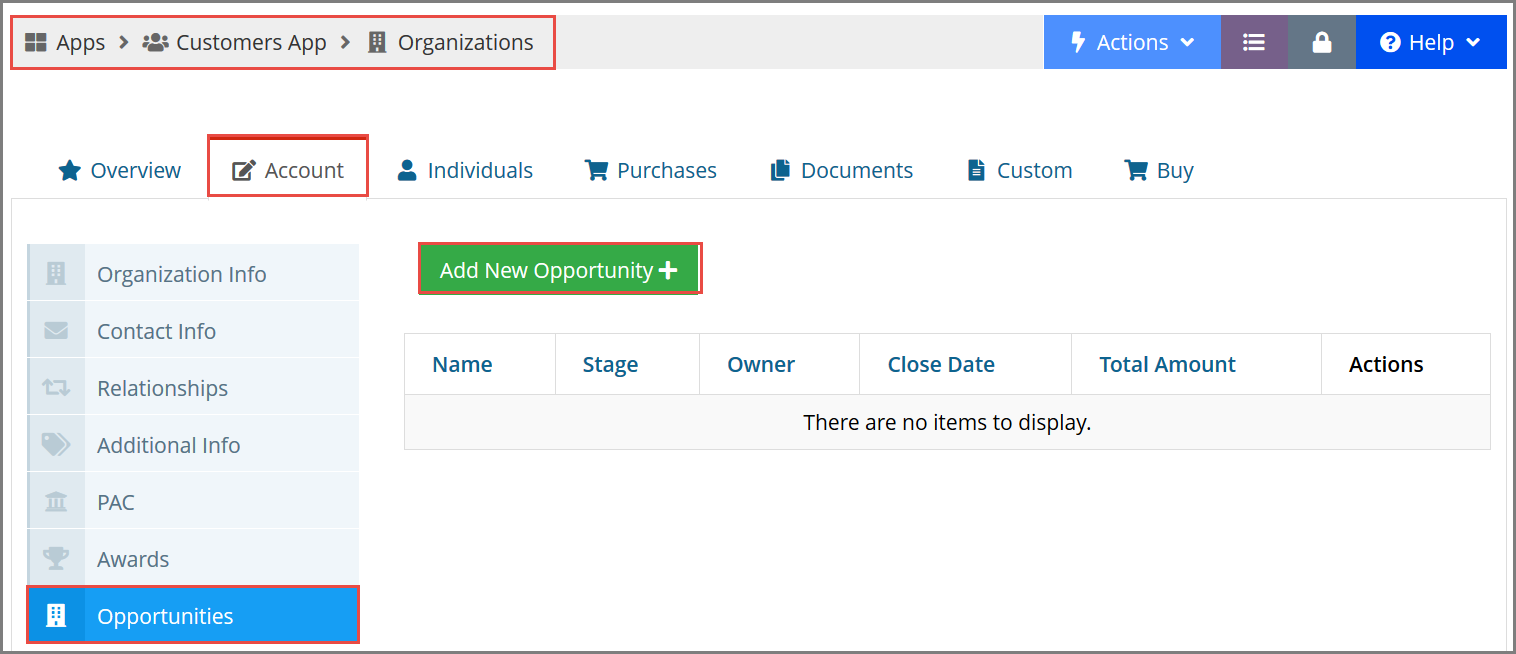
Creating Opportunities from the Organization Record
Staff can now add a new sales opportunity via the Organization Record, without the need to navigate elsewhere to find this option. To access this option,
- Navigate to the Organization Record.
- Select the Account tab.
- Select the Opportunities menu option.
- Click the Add New Opportunity button.
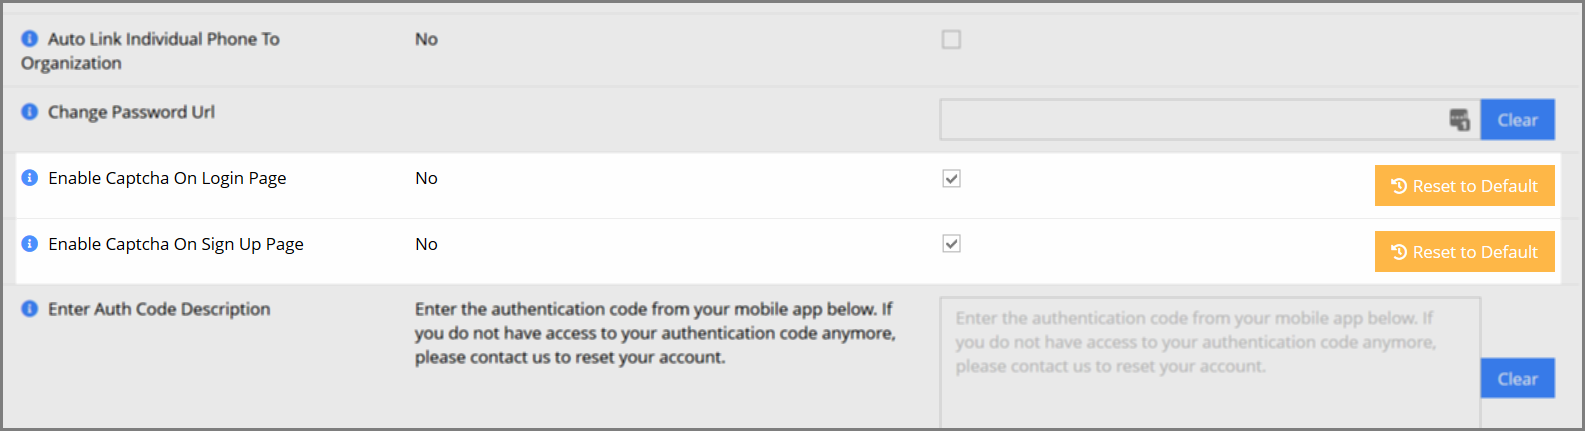
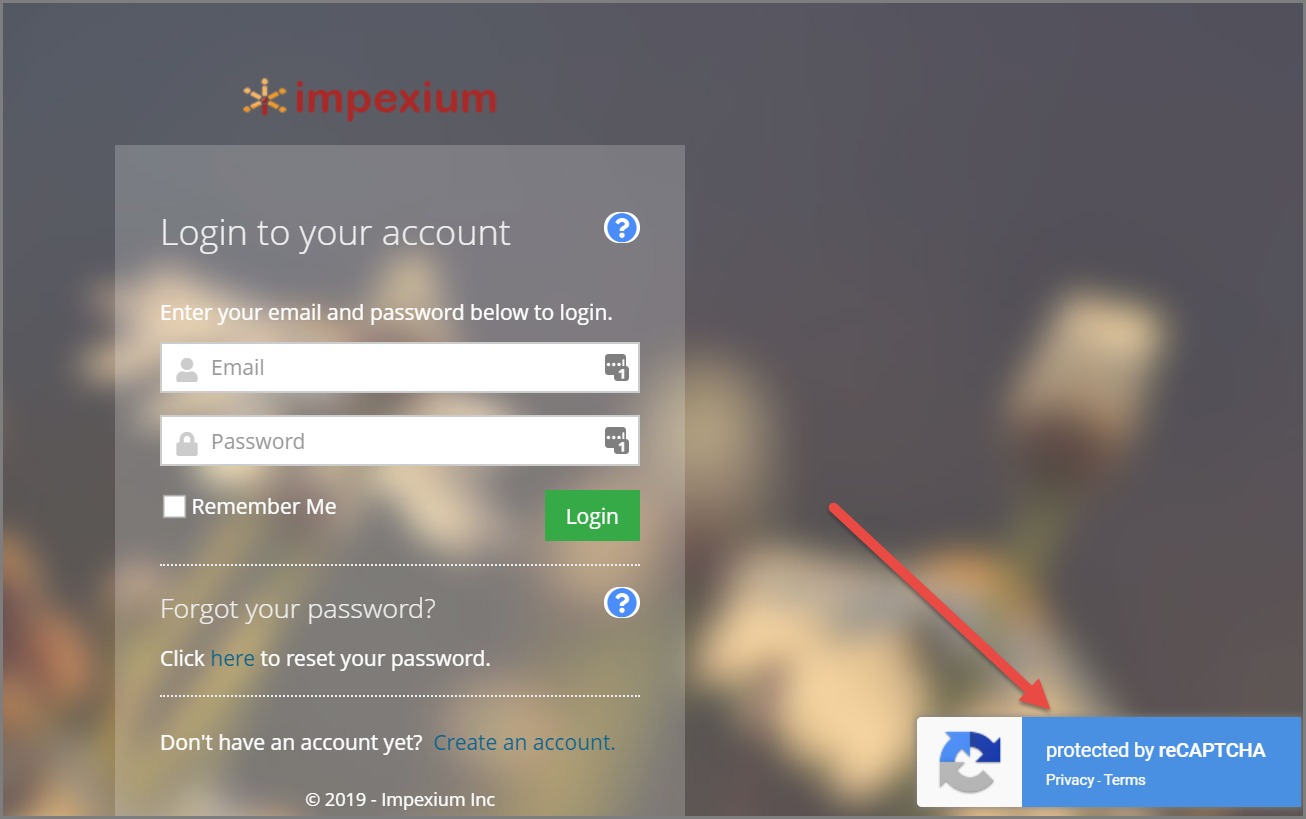
Enabling Captcha on Login & Signup Screens
Two new configuration settings allow staff to enable a captcha plugin on the login and signup screens. These settings are available under the Configurations App.
- Enable Captcha on Login Page
- Enable Captcha on Sign Up Page
Memberships
Configuring a Unique Certificate per Membership Type
For associations allowing members to download a membership certificate, it is now possible to have a different certificate format for each membership in the system.
If this configuration is desired, please contact support@impexium.com for assistance. For clients still in implementation, please contact your project manager.
Scheduling a Mass Membership (or Subscription) Termination Process in Advance
When running a mass term product termination (memberships or subscriptions), staff can now schedule the process to run in advance. The When would you like this process to run? option is visible on the Mass Termination Process form.
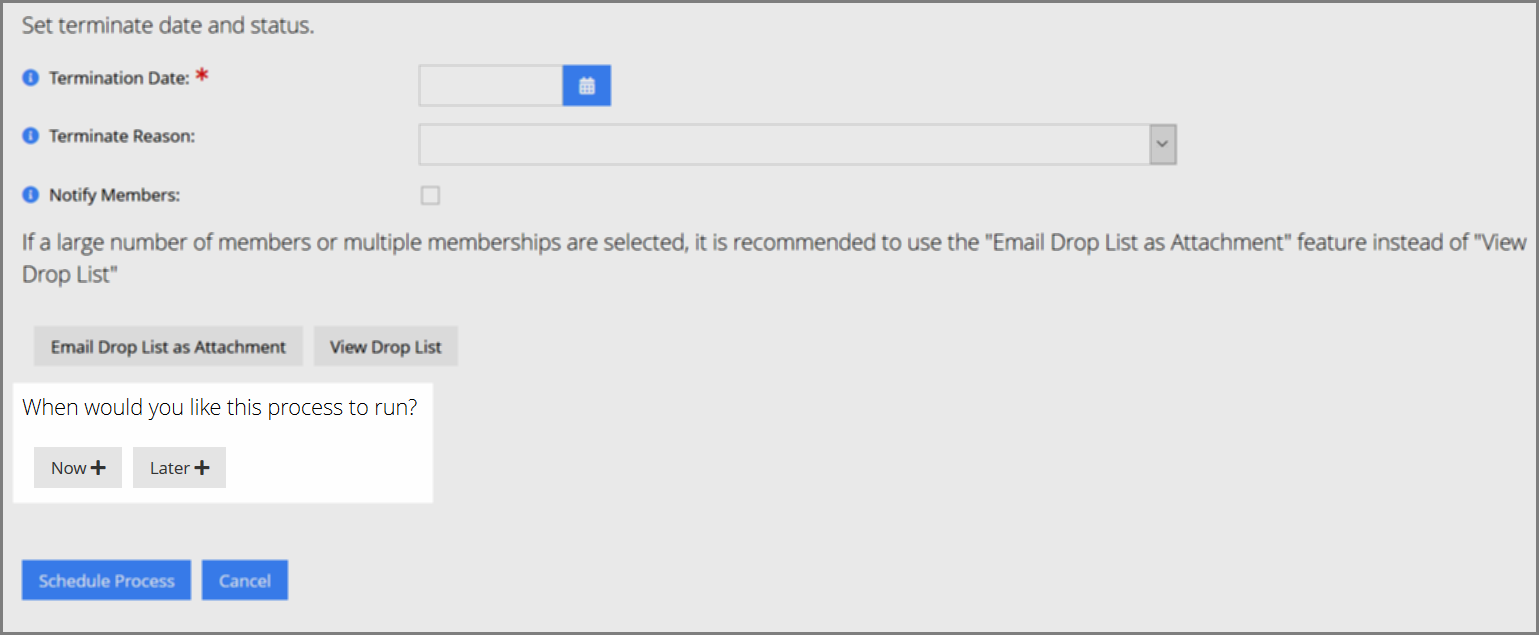
The Mass Drop process is also available in the Processes App, under Ecommerce.DropMembership and Ecommerce.DropSubscription.
Queries
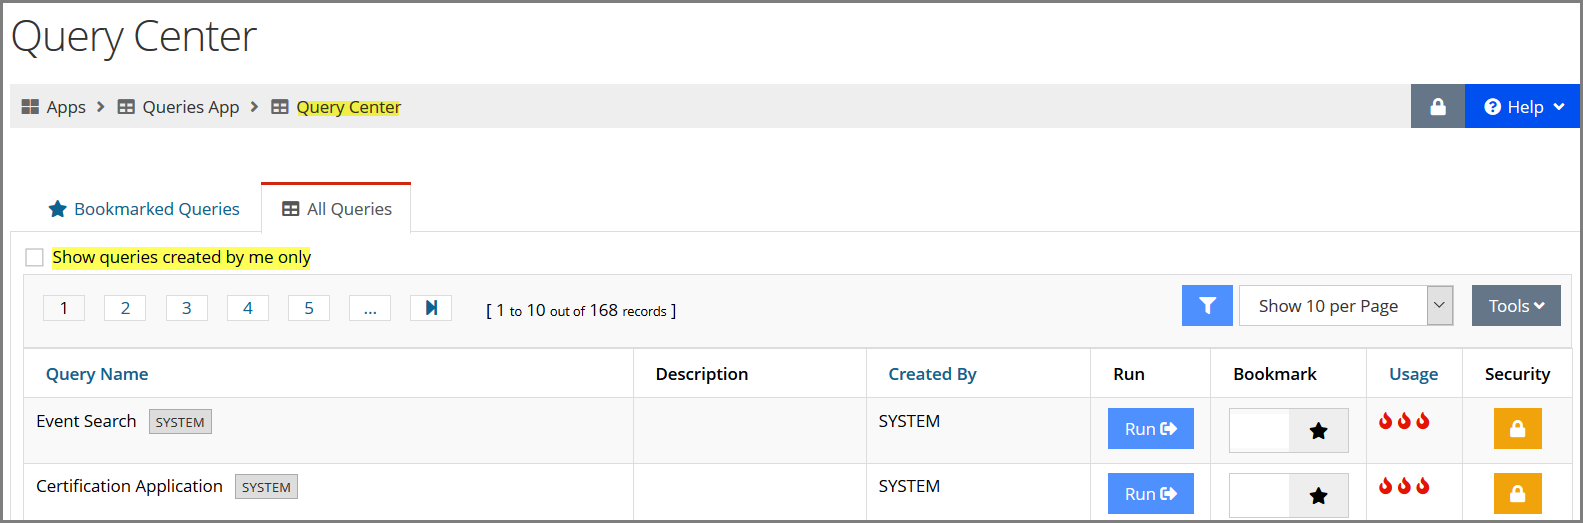
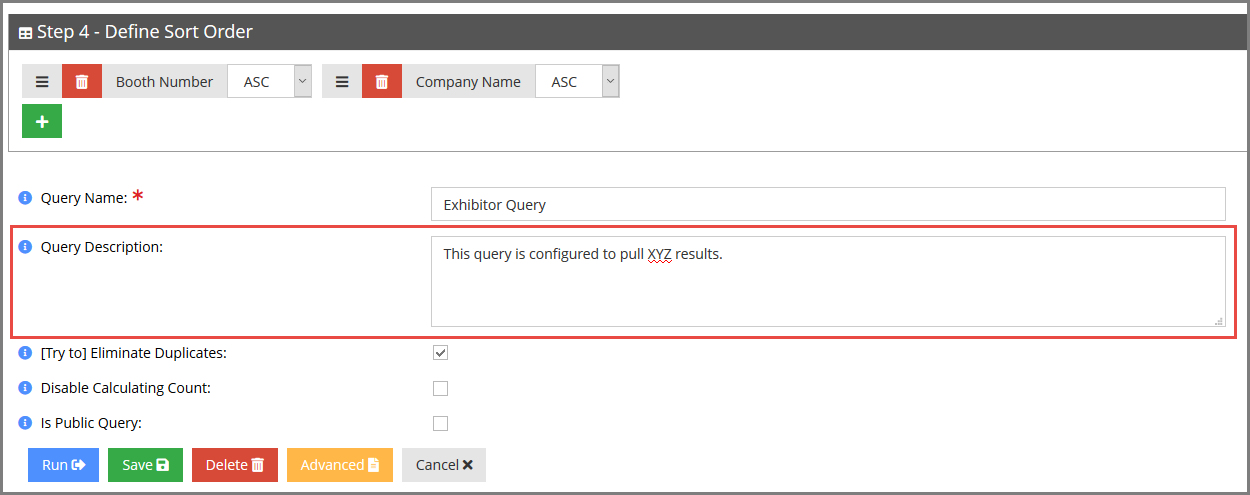
Adding a Description to Custom Queries
Staff can create a short description for non-system queries.
This description is composed in the Query Builder using the Query Description text box and is visible in the Query Center, in the Description column.
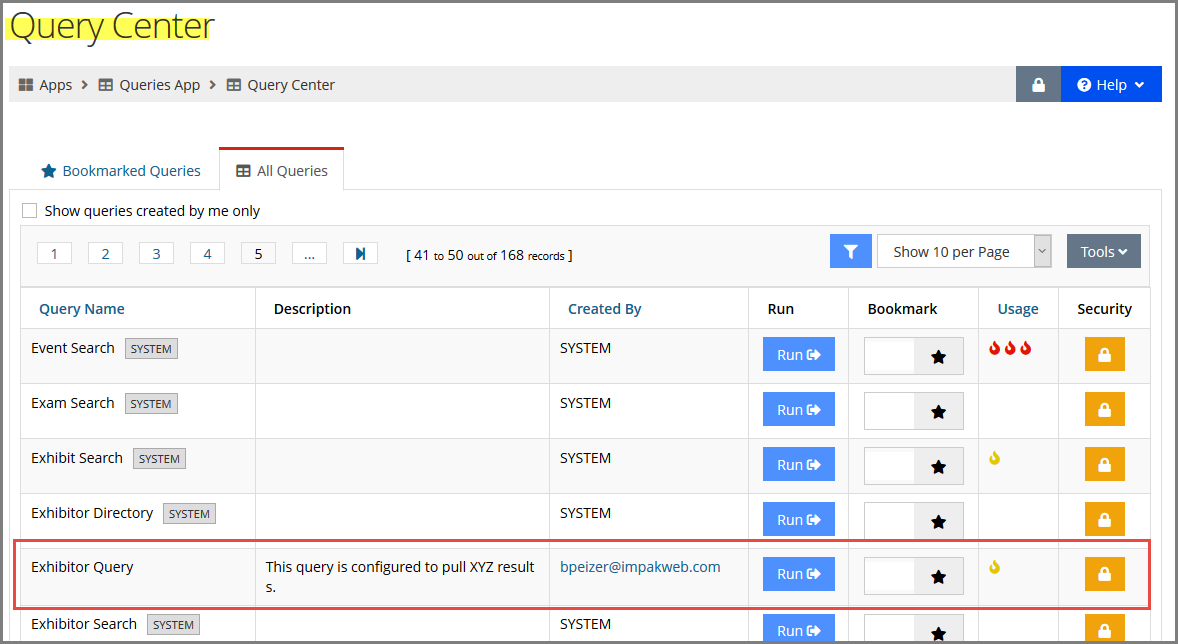
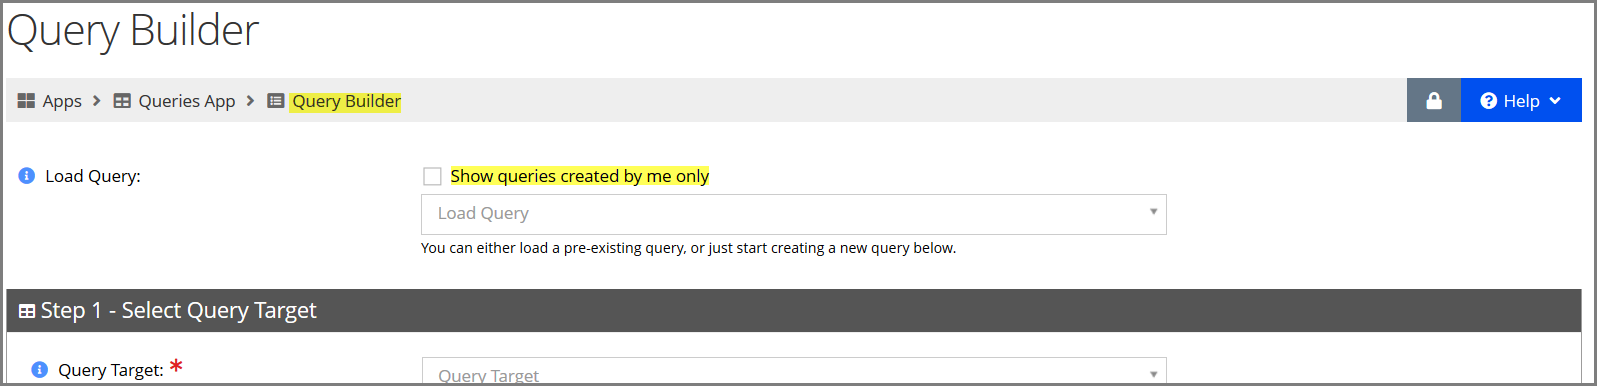
Viewing Queries Created by the Logged in User
The checkbox Show queries created by me only appears in the Query Builder and in the Query Center. This allows the user to see only queries they created.